Kubernetes에서 배포되는 또 하나의 Object로 Service라는 Object가 있습니다. 이 Service객체의 역활은 일종의 Gateway와 같은 역활을 하는데요. 앞서 언급했듯이 실제로 어플리케이션이 컨테이너 안에서 실행이 되고 이런 컨테이너를 담고 있는 Object가 Pod입니다 이 Pod는 개별적으로 IP를 갖게 되는데요. 문제는 Pod의 IP를 외부의 Client에게 노출할 경우 장애로 인해 Pod가 새로 생길경우에는 IP가 변경이 되게 됩니다.
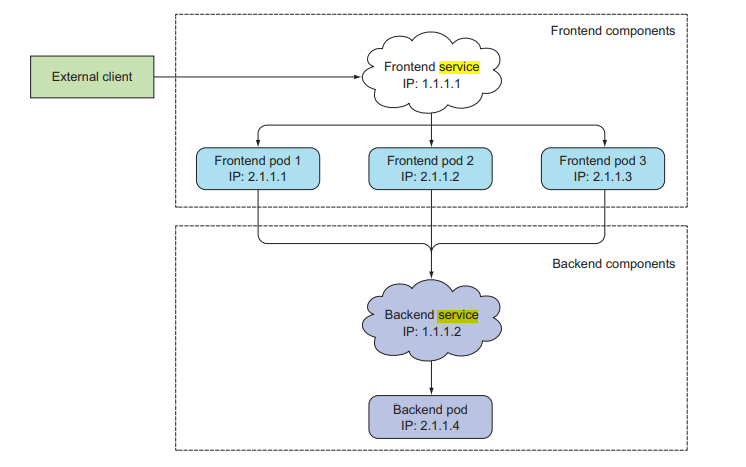
이 경우에 외부에서 해당 Pod로 서비스를 요청을할 경우 예전 IP로 요청을 하기 때문에 서비스 장애가 발생 합니다. 해서 Service라는 Object를 만들고 Service Object의 IP를 외부에 노출을 하고 모든 서비스 요청은 Servie Object로 요청을 하고 Service Object는 각 Pod에 요청을 분산하여 전달을 하고 서비스 처리를 하게 되는 구조 입니다.
이런 Service Object는 아래 그림과 같이 여러가지 Type이 있습니다. 그럼 하나씩 어떤 동작을 하는지 살펴 봅시다.

- Cluster IP: Service 객체의 기본 Type값입니다. Cluster에 IP를 부여 하고 Cluster내부의 Pod들은 Service 객체를 통해서 통신을 하게 되는 구조 입니다. 이 Type은 Cluster내부에서만 동작을 합니다.
- Node Port: 모든 Worker Node의 특정 Port번호를 외부에 노출을 시키고 해당 Node로 들어오는 특정한 Port의 요청은 모두 Service 객체로 전달을 하고 Service는 Pod에 전달하는 구조 입니다.
- Loadbalance: CSP(아마존, MS, 구글, 오라클)등의 CSP 사업자들은 Loadbalancer를 제공을 하는데 이 Loadbalancer에 service를 연결을 해서 사용하는 구조 입니다. 즉 특정 Loadbalancer로 들어 오는 모든 요청은 특정 Service로 전달을 하고 Service 객체는 Pod에 전달해서 처리 하는 구조 입니다.
- ExternalName: Service를 특정 DNS Name에 Mapping을 하고 특정 DNS Name을 돌려 줍니다.
- 이는 일반적으로 Kubernetes 외부에서 실행되는 데이터베이스와 같은 외부 데이터 저장소를 나타내기 위해
Kubernetes 내에서 서비스를 생성하는 데 사용.
- 한 네임스페이스의 Pod가 다른 네임스페이스의 서비스와 통신할 때 해당 ExternalName 서비스
(로컬 서비스로)를 사용
- Ingress: Ingress는 Kubernetes v1.1 추가된 기능으로 NodePort 와LoadBalancer 와 마찬가지로 애플리케이션의 Service를 외부로 노출할때 사용되는 리소스입니다. 외부에서 들어온 HTTP와 HTTPS 트래픽을
- ingress resouce를 생성하여 Cluster내부의 Service로 L7영역에서 라우팅하며 로드밸런싱, TLS, 도메인 기반의 Virtual Hosting을 제공합니다.
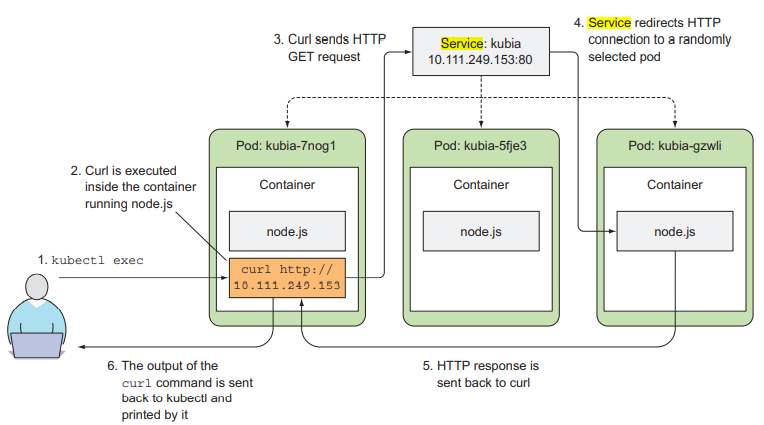
위의 그림은 Kubectl 명령의 exec 옵션을 사용하여 클러스터 내부 서비스를 요청할때 흐름을 보여 줍니다.
즉 클러스터내의 특정한 Pod에서 클러스터 내에서 어떤 요청을 할경우 service 객체를 통해 처리가 된다는 구조를 보여 주는 그림입니다.
그럼 이제 service.yaml파일의 기본적인 내용을 살펴 보고 생성후 배포하는 과정을 진행해 보겠습니다.
|
apiVersion: v1
kind: Service ==> Object의 종류를 선언
metadata:
name: my-nginx
labels:
run: my-nginx ==> Service객체가 관리하는 Taget의 Label값
spec:
type: NodePort ==> Service의 종류를 선언
ports:
- port: 8080 ==> Service객체가 요청을 받는 Port번호 정의
targetPort: 80 ==> Pod가 서비스 객체로 부터 요청을 받는 Port번호
protocol: TCP
selector:
run: my-nginx
|
그러면 이제 ClusterIP Type으로 Service 객체를 만들고 Pod를 배포해 보도록 하겠습니다.
우선 clusterIP 디렉토리를 만들고 pod.yaml 파일을 만들어 아래의 내용을 입력을 한후 저장을 합니다.
service yaml파일에 Type을 정의하지 않으면 기본값이 clusterip로 정의가 됩니다.
|
root@master-VirtualBox:~/test# mkdir clusterIP
root@master-VirtualBox:~/test# cd clusterIP/
root@master-VirtualBox:~/test/clusterIP#
root@master-VirtualBox:~/test/clusterIP#
root@master-VirtualBox:~/test/clusterIP# vi pod.yaml ==> Pod yaml 파일 생성
apiVersion: v1
kind: Pod ==> 객체의 종류를 정의
metadata:
labels:
run: my-nginx ==> Pod의 레이블 값 정의
name: my-nginx-pod
namespace: default
spec:
containers:
- image: nginx
imagePullPolicy: Always
name: my-nginx-container
ports:
- containerPort: 80
protocol: TCP
root@master-VirtualBox:~/test/clusterIP# vi servie.yaml ==> service.yaml 파일 생성
apiVersion: v1
kind: Service ==> 객체의 종류 정의
metadata:
name: my-nginx-svc
labels:
run: my-nginx ==> Service가 관리할 Pod의 Label값 정의
spec:
ports:
- port: 80
protocol: TCP
selector:
run: my-nginx
root@master-VirtualBox:~/test# kubectl apply -f clusterIP/ ==> 생성된 Service와 Pod를 배포
pod/my-nginx-pod created
service/my-nginx-svc created
|
이제 ClusterIP Type과 Pod가 생성이 되었습니다. 그럼 생성된 Service를 아래 명령어로 상펴 보면 Cluster내부에서만 사용가능한 IP가 할당 되었음을 확인할 수 있습니다.
|
root@master-VirtualBox:~/test# kubectl get service -o wide
NAME TYPE CLUSTER-IP EXTERNAL-IP PORT(S) AGE SELECTOR
kubernetes ClusterIP 10.96.0.1 <none> 443/TCP 5d5h <none>
my-nginx-svc ClusterIP 10.96.95.232 <none> 80/TCP 3m38s run=my-nginx
root@master-VirtualBox:~/test# kubectl describe service my-nginx-svc
Name: my-nginx-svc
Namespace: default
Labels: run=my-nginx
Annotations: <none>
Selector: run=my-nginx
Type: ClusterIP
IP Family Policy: SingleStack
IP Families: IPv4
IP: 10.96.95.232
IPs: 10.96.95.232
Port: <unset> 80/TCP
TargetPort: 80/TCP
Endpoints: 172.16.168.208:80
Session Affinity: None
Events: <none>
|
그럼 이제 Service 객체로 curl(command URL)로 서비스 요청을 보내 보면 정상 동작을 함을 알수 있습니다.
|
root@master-VirtualBox:~/test# curl http://10.96.95.232
<!DOCTYPE html>
<html>
<head>
<title>Welcome to nginx!</title>
<style>
html { color-scheme: light dark; }
body { width: 35em; margin: 0 auto;
font-family: Tahoma, Verdana, Arial, sans-serif; }
</style>
</head>
<body>
<h1>Welcome to nginx!</h1>
<p>If you see this page, the nginx web server is successfully installed and
working. Further configuration is required.</p>
<p>For online documentation and support please refer to
<a href="http://nginx.org/">nginx.org.
Commercial support is available at
<p><em>Thank you for using nginx.</em></p>
</body>
</html>
root@master-VirtualBox:~/test#
|
그럼 이번에는 NodePort Type으로 Service 객체를 생성하고 Pod를 배포해 보겠습니다.
아래와 같이 파일과 디렉토리를 생성한 후에 아래의 내용을 yaml파일에 입력 후 저장을 합니다.
|
root@master-VirtualBox:~/test# mkdir NodePort
root@master-VirtualBox:~/test# cd NodePort/
root@master-VirtualBox:~/test/NodePort# vi pod.yaml
apiVersion: v1
kind: Service
metadata:
name: my-nginx-svc
labels:
run: my-nginx
spec:
type: NodePort ==> 서비스 객체의 Type을 NodePort로 정의
ports:
- port: 8080
targetPort: 80
protocol: TCP
selector:
run: my-nginx
|
그럼 이제 생성한 Pod와 Service 객체를 배포를 하고 제대로 설정이 되었는지 조회를해 보겠습니다.
|
root@master-VirtualBox:~/test# kubectl get service
NAME TYPE CLUSTER-IP EXTERNAL-IP PORT(S) AGE
kubernetes ClusterIP 10.96.0.1 <none> 443/TCP 5d5h
my-nginx-svc NodePort 10.96.95.232 <none> 8080:31793/TCP 19m
root@master-VirtualBox:~/test#
root@master-VirtualBox:~/test# kubectl describe service my-nginx-svc
Name: my-nginx-svc
Namespace: default
Labels: run=my-nginx
Annotations: <none>
Selector: run=my-nginx
Type: NodePort
IP Family Policy: SingleStack
IP Families: IPv4
IP: 10.96.95.232
IPs: 10.96.95.232
Port: <unset> 8080/TCP
TargetPort: 80/TCP
NodePort: <unset> 31793/TCP
Endpoints: 172.16.168.208:80
Session Affinity: None
External Traffic Policy: Cluster
Events: <none>
|
위에서 보듯이 NodePort가 31793으로 설정이 되었습니다. 클러스터 외부나 내부에서 해당 포트로 요청을 하면 해당 Port로 들어온 요청 메세지를 Service객체에 전달을 하고 Service 객체는 Pod에 전달을 하여 처리를 합니다.
curl을 사용하여 http 요청 메세지를 아래와 같이 보내 보면 정상 동작 되는걸 알수 있습니다.
|
root@master-VirtualBox:~/test# curl localhost:31793
<!DOCTYPE html>
<html>
<head>
<title>Welcome to nginx!</title>
<style>
html { color-scheme: light dark; }
body { width: 35em; margin: 0 auto;
font-family: Tahoma, Verdana, Arial, sans-serif; }
</style>
</head>
<body>
<h1>Welcome to nginx!</h1>
<p>If you see this page, the nginx web server is successfully installed and
working. Further configuration is required.</p>
<p>For online documentation and support please refer to
<a href="http://nginx.org/">nginx.org.
Commercial support is available at
<p><em>Thank you for using nginx.</em></p>
</body>
</html>
root@master-VirtualBox:~/test#
|
위에서 진행을 해 본것과 같이 나머지 Tpye도 동일한 방식으로 설정을 하고 배포를 하면 됩니다.
다만 Imgress의 경우 ingress에서 어느 서비스로 전달을 할지 정의하는 부분에 대해서만 살펴 보겠 습니다.
|
아래 yaml 파일의 구조를 보면 ingress로 요청이 foo.bar.com으로 들어오고 path가 /foo 이면 Service1객체로 전달 하고, /bar이면 service2객체로 전달을 하는 구성 입니다.
apiVersion: networking.k8s.io/v1
kind: Ingress
metadata:
name: simple-fanout-example
annotations:
kubernetes.io/ingress.class: nginx
nginx.ingress.kubernetes.io/rewrite-target: /
spec:
rules:
- host: foo.bar.com
http:
paths:
- path: /foo
pathType: Exact
backend:
service:
name: service1
port:
number: 4200
- path: /bar
pathType: Exact
backend:
service:
name: service2
port:
number: 8080
그럼 하나만 더 보면 아래는 요청 host가 foo.bar.com 이면 service 1번으로 전달을 하고 bar.foo.com이면 service2번으로 전달을 하는 yaml 설정 입니다.
apiVersion: networking.k8s.io/v1
kind: Ingress
metadata:
name: name-virtual-host-ingress
annotations:
kubernetes.io/ingress.class: nginx
nginx.ingress.kubernetes.io/rewrite-target: /
spec:
rules:
- host: foo.bar.com
http:
paths:
- path: /
pathType: Exact
backend:
service:
name: service1
port:
number: 80
- host: bar.foo.com
http:
paths:
- path: /
pathType: Exact
backend:
service:
name: service2
port:
number: 80
|
'쿠버네티스' 카테고리의 다른 글
| [클라우드] 8. Kubernetes Prob의 종류와 Resource 할당 (6) | 2022.09.18 |
|---|---|
| [클라우드] 7. Deployment strategies (6) | 2022.09.13 |
| [클라우드] 5. Kubernetes Deployment 배포 (1) | 2022.08.31 |
| [클라우드] 4. Kubernetes Replicaset 배포 (4) | 2022.08.28 |
| [클라우드] 3.Kuberdnetes Pod 배포하기 (4) | 2022.08.28 |