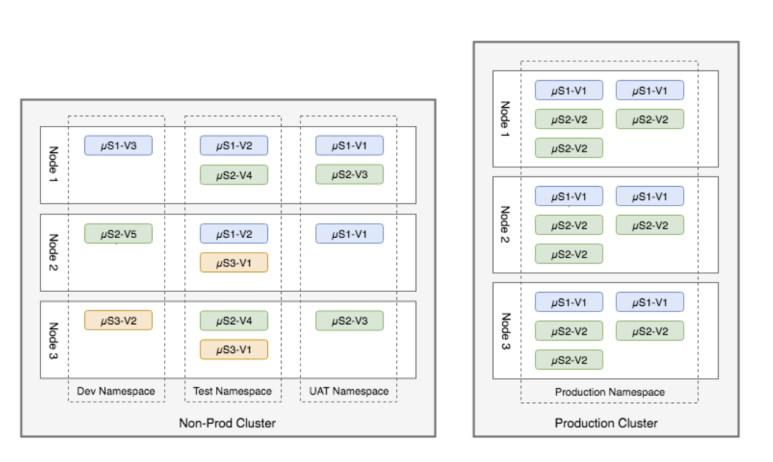
In this post, I will post about Namespace, a virtual cluster function in Kubernetes. In the picture above, Pods of the same color exist in the same Namespace. Create multiple clusters using namespace in one node. The same namespace between each node communicates, that is, it provides the function of a virtual cluster.
Namespace is what makes classification into virtual clusters possible. Then, let's take a look at how to create a namespace and how to distribute pods in the created namespace. First, after installing Kubernetes, a basic Napespace is created as shown below. Please refer to the blog post below for installation instructions.

|
root@master-VirtualBox:~# kubectl get namespaces
NAME STATUS AGE
default Active 4h35m
kube-node-lease Active 4h35m
kube-public Active 4h35m
kube-system Active 4h35m
|
A look at each function is as follows.
- default : If you do not give a namespace value when creating an object, it is a namespace that is assigned.
- kube-system : Namespace of object created from Kubernetes Control Node.
- kube-node-lease: Have a lease object associated with each node. Node lease allows the control plane to detect node failures by the kubelet sending a heart bit.
- The kube-public: namespace is automatically created and can be accessed by all users (including unauthenticated users) with read permission. This namespace is primarily used for publicly visible and readable resources during the entire cluster.
Now, let's see how to create and manage namespaces. In Kubernetes, there are three ways to create an object as follows.
- Object creation using Request method through API Object
- creation using kubectl command Object
- creation using kubectl command and YAML file
Here, we are going to do a deep dive by creating a YAML file. The structure of the YAML file and the explanation of each parameter will be posted later.
Then, we will proceed in the order of creating a deployment, a cluster that can accommodate the development system, and a production namespace that provides actual services, and deploying pods there
First, create a namespace directory under the test directory, and create a dev.yaml file and a prod.yaml file there.
|
root@master-VirtualBox:~# mkdir /test/namespace
root@master-VirtualBox:~# cd /test/namespaces/
root@master-VirtualBox:~/namespaces# vi namespace-dev.yaml
|
Enter the following contents in the namespac-dev.yaml file using vi and save it.
|
apiVersion: v1 ==> using API Version 1
kind: Namespace ==>define Objecct Type
metadata:
name: development ==> define name of namespace
labels:
name: development ==> define label of namespace
|
Now, create a namespace-prod-yaml file through vi, enter the following content in the file, and save it.
|
root@master-VirtualBox:~/namespaces# vi namespace-prod.yaml
|
|
apiVersion: v1
kind: Namespace
metadata:
name: production
labels:
name: production
|
Now create an Object using the yaml file using the kubernetes command.
|
root@master-VirtualBox:~# kubectl apply -f namespaces/
namespace/development created
namespace/production created
|
Try using the Kubectl command to query the created namespace.
|
root@master-VirtualBox:~# kubectl get namespaces --show-labels
NAME STATUS AGE LABELS
default Active 5h58m kubernetes.io/metadata.name=default
development Active 26s kubernetes.io/metadata.name=development,name=development
kube-node-lease Active 5h58m kubernetes.io/metadata.name=kube-node-lease
kube-public Active 5h58m kubernetes.io/metadata.name=kube-public
kube-system Active 5h58m kubernetes.io/metadata.name=kube-system
production Active 26s kubernetes.io/metadata.name=production,name=production
|
Kubernetes has files to manage cluster information. Let's look up cluster information.
|
root@master-VirtualBox:~# kubectl config view
apiVersion: v1
clusters:
- cluster:
certificate-authority-data: DATA+OMITTED
server: https://192.168.1.4:6443
name: kubernetes
contexts:
- context:
cluster: kubernetes
user: kubernetes-admin
name: kubernetes-admin@kubernetes
current-context: kubernetes-admin@kubernetes
kind: Config
preferences: {}
users:
- name: kubernetes-admin
user:
client-certificate-data: REDACTED
client-key-data: REDACTED
|
Look at the contents of the file above. Currently, only the default context called kubernetes is created in the cluster context. Let's add deployment and production, the namespaces we created earlier.
|
root@master-VirtualBox:~# kubectl config set-context dev --namespace=development --cluster=kubernetes --user=kubernetes-admin
Context "dev" created.
root@master-VirtualBox:~# kubectl config set-context prod --namespace=production --cluster=kubernetes --user=kubernetes-admin
Context "prod" created.
|
Now, let's query the cluster context information again.
|
root@master-VirtualBox:~# kubectl config view
apiVersion: v1
clusters:
- cluster:
certificate-authority-data: DATA+OMITTED
server: https://192.168.1.4:6443
name: kubernetes
contexts:
- context:
cluster: kubernetes
namespace: deployment
user: kubernetes-admin
name: dev
- context:
cluster: kubernetes
user: kubernetes-admin
name: kubernetes-admin@kubernetes
- context:
cluster: kubernetes
namespace: production
user: kubernetes-admin
name: prod
current-context: kubernetes-admin@kubernetes
kind: Config
preferences: {}
users:
- name: kubernetes-admin
user:
client-certificate-data: REDACTED
client-key-data: REDACTED
|
As shown in the red part in the above file, you can see that two namespaces, development and production, are added to the context. These two contexts provide a virtual space isolated from each other, making it impossible for objects created in development to communicate with objects created in production context.
Switching between contexts i.e. To create in dev, you need to switch the current context to dev, and to create in prod, you need to deploy the yaml file with the current context in prod. The command to switch between contexts is as follows.
|
root@master:/lab/namespace# kubectl config use-context dev ==> dev context로 전환
Switched to context "dev".
root@master:/lab/namespace# kubectl config current-context ==> 현재 context를 조회
dev
|
As shown above, the currently used context is the dev namespace, and in this state, we will create two pods using the deployment yaml file. Use the vi command to create a development.yaml file, enter the following, and save
|
root@master-VirtualBox:~# vi deployment.yaml
apiVersion: apps/v1 ==> API Version 1 사용
kind: Deployment ==> 배포 Object의 type은 deployment
metadata:
name: httpd-deployment
labels:
app: httpd-deployment ==> define label name
spec:
replicas: 2 ==> define quantity of replication
strategy:
type: RollingUpdate
rollingUpdate:
maxSurge: 1
maxUnavailable: 0
selector:
matchLabels:
app: httpd-deployment
template:
metadata:
labels:
app: httpd-deployment
spec:
containers:
- image: ethos93/go-httpd:v1 ==> define image
imagePullPolicy: Always
name: httpd-deployment
- containerPort: 80
protocol: TCP
|
After creating as shown in the picture above, distribute the yaml file as shown below.
|
root@master-VirtualBox:~/replicaset# kubectl apply -f deployment.yaml
deployment.apps/httpd-deployment created
|
Now, let's query the status of the created Pod.
|
root@master-VirtualBox:~/replicaset# kubectl get pods
NAME READY STATUS RESTARTS AGE
httpd-deployment-d7977cc69-hnjg9 1/1 Running 0 2m17s
httpd-deployment-d7977cc69-mvn8t 1/1 Running 0 2m17s
|
Here, let's check which pod is running on which node.
|
root@master-VirtualBox:~/replicaset# kubectl get pod -o wide
NAME READY STATUS RESTARTS AGE IP NODE NOMINATED NODE READINESS GATES
httpd-deployment-d7977cc69-hnjg9 1/1 Running 0 2m34s 172.16.7.129 worknode2-virtualbox <none> <none>
httpd-deployment-d7977cc69-mvn8t 1/1 Running 0 2m34s 172.16.168.195 worknode1-virtualbox <none> <none>
|
As mentioned before, the pod created above is not visible when you search it in the prod namespace with the kubectl use-context prod command. That is, it will only be visible if it is in the dev namespace.
'Kubernetes' 카테고리의 다른 글
| [Cloud] 6. Kubernetes Service deploy (24) | 2023.02.01 |
|---|---|
| [Cloud] 5. Kubernetes Deployment deploy (29) | 2023.01.30 |
| [Cloud] 4. Kubernetes Replicaset deployment (38) | 2023.01.24 |
| [Cloud] 3.Kuberdnetes Pod deploy (14) | 2022.12.25 |
| [Cloud] 1. Kubernetes Installation (9) | 2022.12.25 |