안녕하세요 이웃님들. ^.^
간만에 전공 분야 관련 글을 하나 포스팅 하려고 합니다.
관련 분야에 종사 하시는 분들은 아시겠지만. 아마존 web Service의 상품 중 하나인 Elastic Kubernetes Service의 배포 방법에 관해서 포스팅을 해보려고 합니다.
우선 Baston Host로 사용할 EC2를 하나 생성을 해주시고.
해당 Host에 접속을 합니다.
- 아래 명령을 사용하여 host에 kubectl을 설치를 진행 합니다.
사용 명령어
sh-4.2$ sudo curl --location -o /usr/local/bin/kubectl https://s3.us-west-2.amazonaws.com/amazon-eks/1.23.7/2022-06-29/bin/linux/amd64/kubectl
그럼 아래와 같이 다운로드가 진행이 됩니다.
|
sh-4.2$ sudo curl --location -o /usr/local/bin/kubectl https://s3.us-west-2.amazonaws.com/amazon-eks/1.23.7/2022-06-29/bin/linux/amd64/kubectl
% Total % Received % Xferd Average Speed Time Time Time Current
Dload Upload Total Spent Left Speed
100 44.4M 100 44.4M 0 0 12.1M 0 0:00:03 0:00:03 --:--:-- 12.1M
|
2. 아래 명령을 사용하여 다운로드한 파일을 실행 파일로 만듭니다.
|
sudo chmod +x /usr/local/bin/kubectl
|
3. 아래 명령을 사용하여 제대로 설치가 되었는지 버전을 확인 합니다.
|
sh-4.2$ kubectl version --short --client
Client Version: v1.23.7-eks-4721010
sh-4.2$
|
4. 아래 명령을 사용하여 eksctl을 다운로드 하고 압축을 해제 합니다.
사용 명령어
curl --location "https://github.com/weaveworks/eksctl/releases/latest/download/eksctl_$(uname -s)_amd64.tar.gz" | tar xz -C /tmp
실행 결과
|
% Total % Received % Xferd Average Speed Time Time Time Current
Dload Upload Total Spent Left Speed
0 0 0 0 0 0 0 0 --:--:-- --:--:-- --:--:-- 0
0 0 0 0 0 0 0 0 --:--:-- --:--:-- --:--:-- 0
100 30.7M 100 30.7M 0 0 12.9M 0 0:00:02 0:00:02 --:--:-- 31.7M
sh-4.2$
|
5. 다운로드한 eksctl을 사용하기 위해 Path에 포함되어 있는 경로인.
/usr/local/bin으로 이동 시킵니다.
사용 명령어
|
h-4.2$ sudo mv -v /tmp/eksctl /usr/local/bin
‘/tmp/eksctl’ -> ‘/usr/local/bin/eksctl’
|
6. 아래 명령을 사용하여 eksctl 버전을 확인 합니다.
|
sh-4.2$ eksctl version
0.139.0
sh-4.2$
|
7. 현재 EC2의 Region및 Shell 환경 변수를 저장하고 화면에 출력 합니다.
사용 명령어
export AWS_REGION=$(curl --silent http://169.254.169.254/latest/meta-data/placement/region) && echo $AWS_REGION
|
h-4.2$ export AWS_REGION=$(curl --silent http://169.254.169.254/latest/meta-data/placement/region) && echo $AWS_REGION
ap-southeast-2
|
위의 출력에서 마지막 라인이 현재의 Region을 표시해 줍니다.
8. 이제 아래 명령을 사용해서 3개의 Node로 구성된 관리형 노드 그룹이 있는 EKS 클러스터를 배포해 보겠 습니다.
실행명령어
|
eksctl create cluster \
--name dev-cluster \
--nodegroup-name dev-nodes \
--node-type t3.medium \
--nodes 3 \
--nodes-min 1 \
--nodes-max 4 \
--managed \
--version 1.23 \
--region ${AWS_REGION}
|
클러스터를 생성하는 데에는 보통 10분에서 20분 정도 소요가 됩니다.
eksctl을 사용하여 EKS 클러스터를 구성을 하면, 기본적으로 VPC하나,
Public Subnet 3개, Private Subnet 3개가 생성 됩니다.
실행 결과
|
2023-05-01 05:17:29 [ℹ] eksctl version 0.139.0
2023-05-01 05:17:29 [ℹ] using region ap-southeast-2
2023-05-01 05:17:29 [ℹ] setting availability zones to [ap-southeast-2c ap-southeast-2a ap-southeast-2b]
2023-05-01 05:17:29 [ℹ] subnets for ap-southeast-2c - public:192.168.0.0/19 private:192.168.96.0/19
2023-05-01 05:17:29 [ℹ] subnets for ap-southeast-2a - public:192.168.32.0/19 private:192.168.128.0/19
2023-05-01 05:17:29 [ℹ] subnets for ap-southeast-2b - public:192.168.64.0/19 private:192.168.160.0/19
2023-05-01 05:17:29 [ℹ] nodegroup "dev-nodes" will use "" [AmazonLinux2/1.23]
2023-05-01 05:17:29 [ℹ] using Kubernetes version 1.23
2023-05-01 05:17:29 [ℹ] creating EKS cluster "dev-cluster" in "ap-southeast-2" region with managed nodes
2023-05-01 05:17:29 [ℹ] will create 2 separate CloudFormation stacks for cluster itself and the initial managed nodegroup
2023-05-01 05:17:29 [ℹ] if you encounter any issues, check CloudFormation console or try 'eksctl utils describe-stacks --region=ap-southeast-2 --cluster=dev-cluster'
2023-05-01 05:17:29 [ℹ] Kubernetes API endpoint access will use default of {publicAccess=true, privateAccess=false} for cluster "dev-cluster" in "ap-southeast-2"
2023-05-01 05:17:29 [ℹ] CloudWatch logging will not be enabled for cluster "dev-cluster" in "ap-southeast-2"
2023-05-01 05:17:29 [ℹ] you can enable it with 'eksctl utils update-cluster-logging --enable-types={SPECIFY-YOUR-LOG-TYPES-HERE (e.g. all)} --region=ap-southeast-2 --cluster=dev-cluster'
2023-05-01 05:17:29 [ℹ]
2 sequential tasks: { create cluster control plane "dev-cluster",
2 sequential sub-tasks: {
wait for control plane to become ready,
create managed nodegroup "dev-nodes",
}
}
2023-05-01 05:17:30 [ℹ] deploying stack "eksctl-dev-cluster-cluster"
2023-05-01 05:30:31 [ℹ] building managed nodegroup stack "eksctl-dev-cluster-nodegroup-dev-nodes"
2023-05-01 05:30:31 [ℹ] deploying stack "eksctl-dev-cluster-nodegroup-dev-nodes"
2023-05-01 05:34:24 [✔] saved kubeconfig as "/home/ssm-user/.kube/config"
2023-05-01 05:34:24 [ℹ] no tasks
2023-05-01 05:34:24 [✔] all EKS cluster resources for "dev-cluster" have been created
2023-05-01 05:34:24 [ℹ] nodegroup "dev-nodes" has 3 node(s)
2023-05-01 05:34:24 [ℹ] node "ip-192-168-17-1.ap-southeast-2.compute.internal" is ready
2023-05-01 05:34:24 [ℹ] node "ip-192-168-50-81.ap-southeast-2.compute.internal" is ready
2023-05-01 05:34:24 [ℹ] node "ip-192-168-88-46.ap-southeast-2.compute.internal" is ready
2023-05-01 05:34:26 [ℹ] kubectl command should work with "/home/ssm-user/.kube/config", try 'kubectl get nodes'
2023-05-01 05:34:26 [✔] EKS cluster "dev-cluster" in "ap-southeast-2" region is ready
|
9. 이제 AWS Console의 서비스에서 CloudFormation을 검색 합니다.

10. Cloudformation을 클릭을 해보면. eks-dev-clouste-cluster라는 CloudFormation 스텍을 생성 중인 것을 볼수 있습니다.

11. eksctl-dev-cluster-cluster를 틀릭하고 리소스탭을 클릭 하여,
생성된 리소스를 확인해 봅니다.

12. 이제 다시 AWS Console의 서비스 검색 창에서 Elastic Kubernetes Service를 검색 후 클릭 합니다.

13. dev-cluster를 클릭 하여 생성 중인 리소스들의 세부 내역을 확인 합니다.
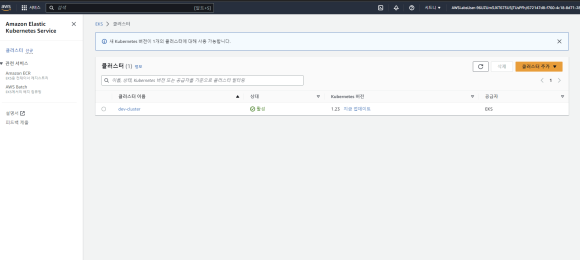
14. 화면 우측 하단의 상태가 활성화 또는 Active상태가 될때까지 기다 립니다.

15. 화면 중간에 컴퓨팅 탭을 클릭하여 연관된 노드 그룹의 상태를 확인 합니다.

위의 화면에서 eks를 생성할때 요구한 Node의 수가 3개로 구성이 된것을 확인 합니다.
16. AWS Console에서 서비스 검색창에서 EC2를 검색 합니다.
EC2 서비스를 클릭을 하면 화면 좌측 하단의 Auto scaling Group을 선택 합니다.

17,이름이 eks로 시작하는 그룹을 클릭하여 세부 내용을 확인 합니다.
eks생성시 사용한 명령어 대로 min값과 max값으로 설정이 된것을 확인 합니다

18. 이제 처음에 연결하였던 baston host의 ssh 연결 화면으로 돌아 갑니다.
아래 명령을 실행하여 생성된 노드의 정보를 확인 합니다.
|
sh-4.2$ kubectl get nodes
NAME STATUS ROLES AGE VERSION
ip-192-168-17-1.ap-southeast-2.compute.internal Ready <none> 25m v1.23.17-eks-a59e1f0
ip-192-168-50-81.ap-southeast-2.compute.internal Ready <none> 25m v1.23.17-eks-a59e1f0
ip-192-168-88-46.ap-southeast-2.compute.internal Ready <none> 25m v1.23.17-eks-a59e1f0
sh-4.2$
|
이제 필요한 유틸리트들과 EKS에서 사용할 노드들의 생성을 완료 하였습니다.
그럼 다음글에서는 이번에 생성한 eks를 통해서 테스트 어플리케이션을 배포 하는 글을 포스팅 하겠습니다.
행복하고 즐거운 하루 되세요.^.^
"이 포스팅은 쿠팡 파트너스 활동의 일환으로, 이에 따른 일정액의 수수료를 제공받습니다."
'아마존 클라우드' 카테고리의 다른 글
| [클라우드] Amazon VPC 및 RDS 생성하기 (118) | 2023.06.08 |
|---|---|
| [클라우드] AWS CI/CD 사용하기 -3 EKS를 사용하여 클러스터 구성 및 배포하기 (156) | 2023.05.11 |
| [클라우드] AWS CI/CD 사용하기 -2 Codepipeline 사용하기. (49) | 2023.05.09 |
| [클라우드] AWS EKS CI/CD 설정하기-1 레포지토리 생성 (61) | 2023.05.09 |
| [클라우드] EKS에 어플리케이션 배포하기 (52) | 2023.05.08 |