안녕하세요 이웃님들..
좋은 아침 입니다.
'오늘은 테라폼 코드의 Module을 사용해서 AWS Infra를 설정하는 방법에 대해서 포스팅 해보겠습니다.
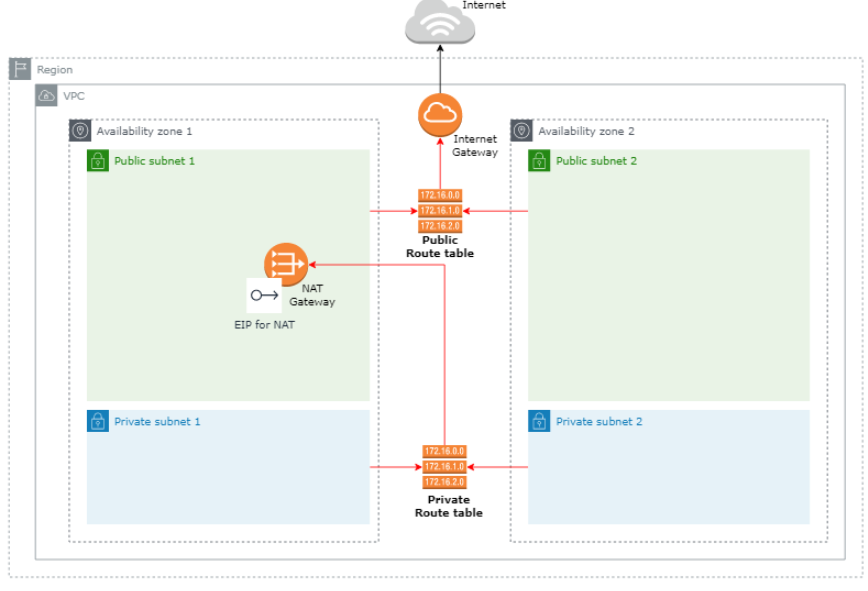
우선 전체 적인 인프라 구성은 위외 같습니다. VPC 1개, Subnet 4개, Routing table 2개, IGW, NAT를 구성 해보겠습니다.
우선 Root Module과 Child Module로 구성을 해볼께요.
root module의 디렉토리 이름은 "test_module" child module 이름은 " vpc_module"로 디렉토리를 아래와 같이 생성을 합니다.
|
ubuntu@ip-10-0-10-80:~$ mkdir test_module
ubuntu@ip-10-0-10-80:~$ cd test_module/ ubuntu@ip-10-0-10-80:~/test_module$ mkdir vpc_module |

vpc_module에서 생성할 구성도는 위와 같습니다. main.tf vars.tf, output.tf파일을 아래와 같이 작성을 합니다.c
1) main.tf 파일
ubuntu@ip-10-0-10-80:~/test_module$ vi main.tf
data "aws_availability_zones" "available" {}  #aws에 az 정보를 쿼리

resource "aws_vpc" "terra" {                   #vpc 생성
  cidr_block = "10.0.0.0/16"

  tags = {
    "Name" = "${var.resource_prefix}-terraform-vpc"
  }
}

resource "aws_subnet" "public" {             # public subnet 생성
  count = 2               # Repeat the code block below twice

  vpc_id                  = aws_vpc.terra.id
  availability_zone       = data.aws_availability_zones.available.names[count.index]
  cidr_block              = "10.0.${count.index}.0/24"
  map_public_ip_on_launch = true

  tags = {
    "Name" = "${var.resource_prefix}-terraform-public-subnet${count.index+1}"
  }
}

resource "aws_subnet" "private" {           #private subnet 생성
  count = 2               # Repeat the code block below twice

  vpc_id                  = aws_vpc.terra.id
  availability_zone       = data.aws_availability_zones.available.names[count.index]
  cidr_block              = "10.0.1${count.index}.0/24"
  map_public_ip_on_launch = false

  tags = {
    "Name" = "${var.resource_prefix}-terraform-private-subnet${count.index+1}"
  }
}
resource "aws_internet_gateway" "terra" {
  vpc_id = aws_vpc.terra.id

  tags = {
    Name = "${var.resource_prefix}-terraform-eks-ig"
  }
}

resource "aws_nat_gateway" "terra" {
  allocation_id = "${aws_eip.nat.id}"
  subnet_id = "${element(aws_subnet.public.*.id,0)}"

  tags = {
    Name = "${var.resource_prefix}-terraform-nat-gw"
  }
}

resource "aws_route_table" "public" {
  vpc_id = aws_vpc.terra.id

  route {
    cidr_block = "0.0.0.0/0"
    gateway_id = aws_internet_gateway.terra.id
  }

  tags = {
    "Name" = "${var.resource_prefix}-terraform-public-route"
  }
}

resource "aws_route_table" "private" {
  vpc_id = aws_vpc.terra.id

  route {
    cidr_block = "0.0.0.0/0"
    gateway_id = aws_nat_gateway.terra.id
  }

  tags = {
    "Name" = "${var.resource_prefix}-terraform-private-route",
  }
}

resource "aws_route_table_association" "public" {
  count = 2

  subnet_id      = aws_subnet.public.*.id[count.index]
  route_table_id = aws_route_table.public.id
}

resource "aws_route_table_association" "private" {
  count = 2

  subnet_id      = aws_subnet.private.*.id[count.index]
  route_table_id = aws_route_table.private.id
}

resource "aws_eip" "nat" {
  tags = {
    Name = "${var.resource_prefix}-terraform-NAT"
  }
}
2) 변수명을 정의 하는 vars.tf 파일을 아래와 같이 작성 한다.
ubuntu@ip-10-0-10-80:~/test_module$ vi vars.tf

variable "resource_prefix" {}
3) output.tf파일을 아래와 같이 작성 한다.
child module인 VPC 모듈에서 outputs.tf는 출력 목적이 아니고 root module에서 outputs 결과를 참조하기 위함이다.
output "vpc_id" {
  value = aws_vpc.terra.id
}
output "private_subnet_id" {
  value = [aws_subnet.private.*.id[0], aws_subnet.private.*.id[1]]
}
4) root module 디렉토리에서 tree를 이용해 구조를 살펴 본다.
ubuntu@ip-10-0-10-80:~/test_module/vpc_module$ cd ..

ubuntu@ip-10-0-10-80:~/test_module$ tree
.
└── vpc_module
    ├── main.tf
    ├── output.tf
    └── vars.tf
5) 이제 root module을 main.tf 파일을 아래와 같이 작성 한다.
provider "aws" {                 # CSP를 정의 합니다.
  region = var.aws_region        #vars.tf의 파일을 참조 합니다.
}

module "vpc" {                   #child module을 정의해 줍니다.
  source          = "./vpc_module"
  resource_prefix = var.resource_prefix
}
6) vars.tf 파일을 아래와 같이 작성을 합니다.
ubuntu@ip-10-0-10-80:~/test_module$ vi vars.tf

terraform {
  backend "s3" {
    bucket = "<<YOUR_S3_BUCKET_NAME>>"       # 보유하고 있는 s3 bucket의 이름 입력
    key    = "module/terraform.tfstate"
    region = "<<YOUR_S3_BUCKET_REGION>>"     # 👈 s3 bucket이 있는 지역을 선언
  }
}

variable "aws_region" {
  default     = null
  type        = string
  description = "AWS region"
}

variable "resource_prefix" {
  default     = null
  type        = string
  description = "resource prefix"
}
7) vars.tf의 변수에 입력될 값을 가지고 있는 terraform.tfvars 파일을 아래와 같이 작성 합니다.
ubuntu@ip-10-0-10-80:~/test_module$ vi terraform.tfvars
aws_region      = "us-east-1"       # 👈 us-east-1  ==> 사용할 region을 입력
resource_prefix = "test"            # 리소스의 prefix값으로 사용할 값을 입력
8) 이제 필요한 플러그인을 다운 받기 위해 아래 명령을 실행 합니다.
ubuntu@ip-10-0-10-80:~/test_module$ terraform init

Initializing the backend...

Successfully configured the backend "s3"! Terraform will automatically
use this backend unless the backend configuration changes.
Initializing modules...

Initializing provider plugins...
- Finding latest version of hashicorp/aws...
- Installing hashicorp/aws v5.39.1...
- Installed hashicorp/aws v5.39.1 (signed by HashiCorp)

Terraform has created a lock file .terraform.lock.hcl to record the provider
selections it made above. Include this file in your version control repository
so that Terraform can guarantee to make the same selections by default when
you run "terraform init" in the future.

Terraform has been successfully initialized!

You may now begin working with Terraform. Try running "terraform plan" to see
any changes that are required for your infrastructure. All Terraform commands
should now work.

If you ever set or change modules or backend configuration for Terraform,
rerun this command to reinitialize your working directory. If you forget, other
commands will detect it and remind you to do so if necessary.
ubuntu@ip-10-0-10-80:~/test_module$
9) 이제 코드를 검증 하기 위해 terraform plan명령을 실행 합니다.
ubuntu@ip-10-0-10-80:~/test_module$ terraform plan
module.vpc.data.aws_availability_zones.available: Reading...
module.vpc.data.aws_availability_zones.available: Read complete after 0s [id=us-east-1]

Terraform used the selected providers to generate the following execution plan. Resource actions are indicated with the following symbols:
  + create

Terraform will perform the following actions:

  # module.vpc.aws_subnet.private[0] will be created
  + resource "aws_subnet" "private" {
      + arn                                            = (known after apply)
      + assign_ipv6_address_on_creation                = false
      + availability_zone                              = "us-east-1a"
      + availability_zone_id                           = (known after apply)
      + cidr_block                                     = "10.0.10.0/24"
      + enable_dns64                                   = false
      + enable_resource_name_dns_a_record_on_launch    = false
      + enable_resource_name_dns_aaaa_record_on_launch = false
      + id                                             = (known after apply)
      + ipv6_cidr_block_association_id                 = (known after apply)
      + ipv6_native                                    = false
10) 이제 plan의 출력물을 확인해 보고 실제로 생성하기 위해 terraform apply를 실행하고
중간에 enter value값에 yes를 입력 한다.
ubuntu@ip-10-0-10-80:~/test_module$ terraform apply
module.vpc.data.aws_availability_zones.available: Reading...
module.vpc.data.aws_availability_zones.available: Read complete after 1s [id=us-east-1]

Terraform used the selected providers to generate the following execution plan. Resource actions are indicated with the following symbols:
  + create

Terraform will perform the following actions:

  # module.vpc.aws_eip.nat will be created
  + resource "aws_eip" "nat" {
      + allocation_id        = (known after apply)
      + association_id       = (known after apply)
      + carrier_ip           = (known after apply)
      + customer_owned_ip    = (known after apply)
      + domain               = (known after apply)
      + id                   = (known after apply)
      + instance             = (known after apply)
      + network_border_group = (known after apply)
      + network_interface    = (known after apply)
      + private_dns          = (known after apply)
      + private_ip           = (known after apply)
      + public_dns           = (known after apply)
      + public_ip            = (known after apply)
      + public_ipv4_pool     = (known after apply)
      + tags                 = {
Do you want to perform these actions?
  Terraform will perform the actions described above.
  Only 'yes' will be accepted to approve.

  Enter a value: yes

module.vpc.aws_nat_gateway.terra: Destroying... [id=nat-0b0a07888b105b3e9]
module.vpc.aws_nat_gateway.terra: Still destroying... [id=nat-0b0a07888b105b3e9, 10s elapsed]
module.vpc.aws_nat_gateway.terra: Still destroying... [id=nat-0b0a07888b105b3e9, 20s elapsed]
module.vpc.aws_nat_gateway.terra: Still destroying... [id=nat-0b0a07888b105b3e9, 30s elapsed]
module.vpc.aws_nat_gateway.terra: Still destroying... [id=nat-0b0a07888b105b3e9, 40s elapsed]
module.vpc.aws_nat_gateway.terra: Still destroying... [id=nat-0b0a07888b105b3e9, 50s elapsed]
module.vpc.aws_nat_gateway.terra: Still destroying... [id=nat-0b0a07888b105b3e9, 1m0s elapsed]
module.vpc.aws_nat_gateway.terra: Destruction complete after 1m1s
module.vpc.aws_nat_gateway.terra: Creating...
module.vpc.aws_nat_gateway.terra: Still creating... [10s elapsed]
module.vpc.aws_nat_gateway.terra: Still creating... [20s elapsed]
11) 이제 생성된 인프라의 상태를 terraform state list 명령을 이용해서 확인을 하고 AWS WEB Console로 로그인을 해서 생성된 Infra를 확인합니다.
ubuntu@ip-10-0-10-80:~/test_module$ terraform state list
module.vpc.data.aws_availability_zones.available
module.vpc.aws_eip.nat
module.vpc.aws_internet_gateway.terra
module.vpc.aws_nat_gateway.terra
module.vpc.aws_route_table.private
module.vpc.aws_route_table.public
module.vpc.aws_route_table_association.private[0]
module.vpc.aws_route_table_association.private[1]
module.vpc.aws_route_table_association.public[0]
module.vpc.aws_route_table_association.public[1]
module.vpc.aws_subnet.private[0]
module.vpc.aws_subnet.private[1]
module.vpc.aws_subnet.public[0]
module.vpc.aws_subnet.public[1]
module.vpc.aws_vpc.terra
ubuntu@ip-10-0-10-80:~/test_module$
위의 출력물과 같이 모든 리소스가 생성이 되었습니다.
12) 생성된 인프라를 삭제 하기 위해서 terraform destroy를 실행하여 생성된 인프라 모두를 삭제 합니다.
ubuntu@ip-10-0-10-80:~/test_module$ terraform destroy
module.vpc.aws_eip.nat: Refreshing state... [id=eipalloc-09cd887ca8320d3b4]
module.vpc.data.aws_availability_zones.available: Reading...
module.vpc.aws_vpc.terra: Refreshing state... [id=vpc-0c1d48d4014106385]
module.vpc.data.aws_availability_zones.available: Read complete after 0s [id=us-east-1]
module.vpc.aws_subnet.private[1]: Refreshing state... [id=subnet-0beb471f53d08d8c5]
module.vpc.aws_subnet.public[1]: Refreshing state... [id=subnet-0f06a8b1c54a81f0c]
module.vpc.aws_subnet.public[0]: Refreshing state... [id=subnet-0f4b51cca7b00950c]
module.vpc.aws_internet_gateway.terra: Refreshing state... [id=igw-0d4217fcf9977882f]
module.vpc.aws_subnet.private[0]: Refreshing state... [id=subnet-0b9f986eab046e931]
module.vpc.aws_route_table.public: Refreshing state... [id=rtb-0d791d5b6a25bf80c]
module.vpc.aws_nat_gateway.terra: Refreshing state... [id=nat-0d49606f7fed8f717]
module.vpc.aws_route_table.private: Refreshing state... [id=rtb-0b14ca573af3bef55]
module.vpc.aws_route_table_association.public[1]: Refreshing state... [id=rtbassoc-00e645900f450fabd]
module.vpc.aws_route_table_association.public[0]: Refreshing state... [id=rtbassoc-0e463204016cb8b3d]
module.vpc.aws_route_table_association.private[0]: Refreshing state... [id=rtbassoc-09602e0296d6b4351]
module.vpc.aws_route_table_association.private[1]: Refreshing state... [id=rtbassoc-04c22eedb01e6f649]

Plan: 0 to add, 0 to change, 14 to destroy.

Do you really want to destroy all resources?
  Terraform will destroy all your managed infrastructure, as shown above.
  There is no undo. Only 'yes' will be accepted to confirm.

  Enter a value: yes

module.vpc.aws_route_table_association.public[1]: Destroying... [id=rtbassoc-00e645900f450fabd]
module.vpc.aws_route_table_association.private[1]: Destroying... [id=rtbassoc-04c22eedb01e6f649]
module.vpc.aws_route_table_association.private[0]: Destroying... [id=rtbassoc-09602e0296d6b4351]
module.vpc.aws_route_table_association.public[0]: Destroying... [id=rtbassoc-0e463204016cb8b3d]
module.vpc.aws_route_table_association.private[0]: Destruction complete after 1s
module.vpc.aws_route_table_association.private[1]: Destruction complete after 1s
module.vpc.aws_route_table.private: Destroying... [id=rtb-0b14ca573af3bef55]
module.vpc.aws_subnet.private[1]: Destroying... [id=subnet-0beb471f53d08d8c5]
module.vpc.aws_subnet.private[0]: Destroying... [id=subnet-0b9f986eab046e931]
module.vpc.aws_route_table_association.public[1]: Destruction complete after 1s
module.vpc.aws_route_table_association.public[0]: Destruction complete after 1s
module.vpc.aws_route_table.public: Destroying... [id=rtb-0d791d5b6a25bf80c]
13) 이제 모두 삭제가 되었는지 terraform state list 명령으로 확인응ㄹ 합니다.
ubuntu@ip-10-0-10-80:~/test_module$ terraform state list
ubuntu@ip-10-0-10-80:~/test_module$
'테라폼' 카테고리의 다른 글
| [테라폼] Terraform 사용 방법 알아 보기 (62) | 2024.03.11 |
|---|---|
| [테라폼] Terraform 환경 구축 하기 (54) | 2024.03.10 |