Since all scripts are text-based, there are many inconveniences to use. So, in this chapter, we will learn how to use graphics in scripts.
1. Create a text menu
It seems cleaner from the user's point of view to clear everything currently displayed on the screen before using the graphic in a script. The command for this is the clear command. And you can use the echo command to decide what to display on the graphic. Basically, the echo command shows only printable characters. In other words -t. Newline characters are not output. To apply this to the screen, use the echo -e option and use it as follows.
echo -e "1.\tDisplay disk space"
Let's look at an example of a script that uses it with graphics mode.
|
#! /bin/bash
clear
echo
echo -e "\t\t\tSys Admin Menu\n"
echo -e "\t1. Display disk space"
echo -e "\t2. Display logged on users"
echo -e "\t3. Display memory usage"
echo -e "\t0. Exit menu\n\n"
echo -en "\t\tEnter option:"
read -n 1 option
실행을 시켜 보면
Sys Admin Menu
1. Display disk space
2. Display logged on users
3. Display memory usage
0. Exit menu
Enter option:
|
Now, let's create a screen using a function. First, let's make the above main display a finction called menu, and create code using case syntax for the rest of the action.
|
#!/bin/bash
# simple script menu
function diskspace {
clear
df -k
}
function whoseon {
clear
who
}
function memusage {
clear
cat /proc/meminfo
}
function menu {
clear
echo
echo -e "\t\t\tSys Admin Menu\n"
echo -e "\t1. Display disk space"
echo -e "\t2. Display logged on users"
echo -e "\t3. Display memory usage"
echo -e "\t0. Exit program\n\n"
echo -en "\t\tEnter option: "
read -n 1 option
}
while [ 1 ]
do
menu ==> Call the menu function to display the main screen
case $option in
0)
break ;;
1)
diskspace ;;
2)
whoseon ;;
3)
memusage ;;
*)
clear
echo "Sorry, wrong selection";;
esac
echo -en "\n\n\t\t\tHit any key to continue"
read -n 1 line ==>Entering a value other than 0 calls menu.
done
clear
When you run it, the main menu appears as shown below.
Sys Admin Menu
1. Display disk space
2. Display logged on users
3. Display memory usage
0. Exit program
Enter option: 2
If you put the number shown above in the input, the function defined in the code is called and executed.
hyowon tty7 2021-06-27 06:53 (:0)
Hit any key to continue
|
Using the Select command
The Select command allows you to create a menu from one command line. And let it process the input value automatically. How to use the Select command is as follows.
.
select variabl in list
do
commands
done
The select command separates all characters listed in the list with a space. And each of these characters is displayed separately. Let's run the example below.
|
#!/bin/bash
# using select in the menu
function diskspace {
clear
df -k
}
function whoseon {
clear
who
}
function memusage {
clear
cat /proc/meminfo
}
PS3="Enter option: "
select option in "Display disk space" "Display logged on users"
"Display memory usage" "Exit program"
do
case $option in
"Exit program")
break ;;
"Display disk space")
diskspace ;;
"Display logged on users")
whoseon ;;
"Display memory usage")
memusage ;;
*)
clear
echo "Sorry, wrong selection";;
esac
done
clear
$
When you run it, you can see that numbering and other messages are automatically displayed than when writing using a singular echo statement.
|
2. Add color
Most terminal emulation software recognizes ANSI escape codes. ANSI escape codes can configure the screen display format. This code starts with the Control sequence indicator (CSI). And in ANSI escape code, there is a code for the cursor position and the part to be erased from the screen, which is called SGR (Select Graphic Rendition). The format of sge is as follows.
CSIn[;k]m
Here, m stands for SGR code, and n and k indicate which display control to use. Here, there are three display control codes as follows.
■ Effect control codes
■ Foreground color control codes
■ Background color control codes

[Effect Control code]
The table above shows the Effect Control Code values. If you want to use an Italian font, you can set it to CSI3m. If you want to use an Italian font and blink, you can set it to CSI3;5m.
Foreground and background colors control use 2 digits. Foreground has 2 digit codes starting with 3 and backgrocund has 2 digit codes starting with 4. The table below is a table of available codes.
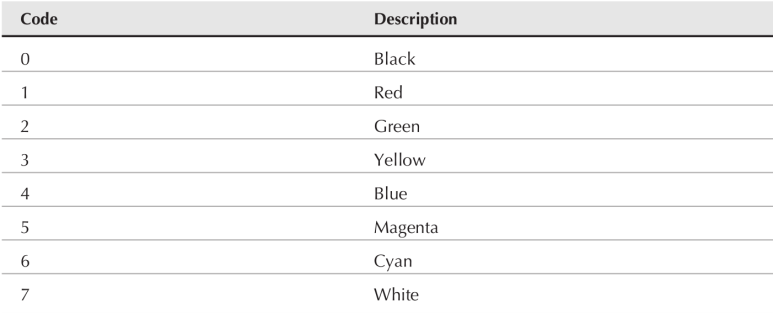
So, if you want to use white as the foreground color, you can use CSI37m. For the background, you can use CSI47m like this. If you want to set both foreground and background at the same time, you can use it by setting it as follows.
CSI31;40m
3. Using Windows
I made a menu menu using a script and tried to color it, but it still lacks a lot compared to the window graphic. Fortunately, Linnus can implement this using the dialog package.
dialog pacakage
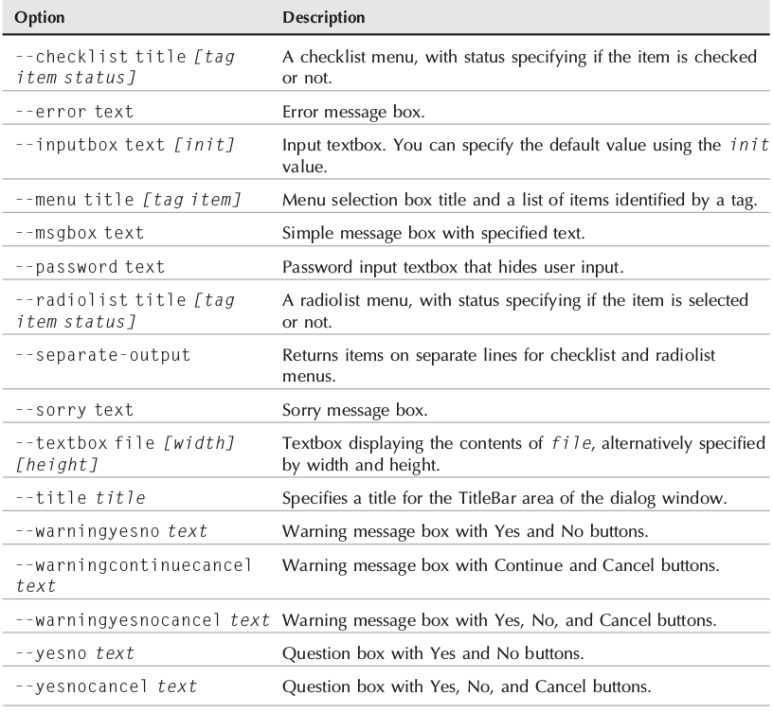
The table below shows the widgets that can be used in the dialog package. And how to use it is as follows.
dialog --widget parameters
Widget indicates the name of the widget you want to use in the table below, and the parameter can specify the size of the widget.

And the widget output is shown in the following two ways.
■ Using STDERR
■ Using the exit code status
The exit code state will be used to determine which button is selected by the user. For example, in the YesNo widget, Yes and Ok return 0 exit codes, and No and Cancel return different code values. If the widget returns data, the dialog command returns the data to STDERR and you can use the standard bash shell redirect. The following will save the age of the user input as the widget of the inputbox as age.txt.
dialog --inputbox "Enter your age:" 10 20 2>age.txt
mesgbox widget
The widget most used in scripts is mesgbox. The usage syntax is as follows.
$ dialog --title Testing --msgbox "This is a test" 10 20
With the title widget, you can set the title of the mesgbox -- " This is a test" after the --msgbox simply displays the text to be displayed in the msgbox. And 10 20 is a parameter that specifies the size.
yesno widget
You can think of the yesno widget as adding one more function to msgbox. msgbox shows only one input button ok, but yesno box shows two input buttons: Yes and No. The usage syntax is as follows
$ dialog --title "Please answer" --yesno "Is this thing on?" 10 20
The usage method is the same as that of msgbox.
textbox widget
The textbox widget provides a scrollable window. How to use is as follows.
$ dialog --textbox /etc/passwd 15 45
Displays the contents of the /etc/passwd file in the text box with a size of 15 45.
menu widget
The menu widget is a widget that can simply execute the code created in the previous chapter. How to use is as follows.
$dialog --menu "Sys Admin Menu" 20 30 10 1 "Display disk space" 2 "Display users" 3 "Display memory usage" 4 "Exit" 2> text.txt
The title of the menu is Sys Admin Menu, the height and width are 20 30 size, and the number of menus to be displayed on one screen is defined as 10, and the next menu item is numbered from 1 to 4 and the input result is saved as text.txt file. This is the phrase that becomes this.
fselect widget
It is a widget that can find the location of a file and attach a file instead of receiving user input. How to use is as follows.
$ dialog --title "Select a file" --fselect $HOME/ 10 50 2>file.txt
The directory following -fselect is where to start looking for files.
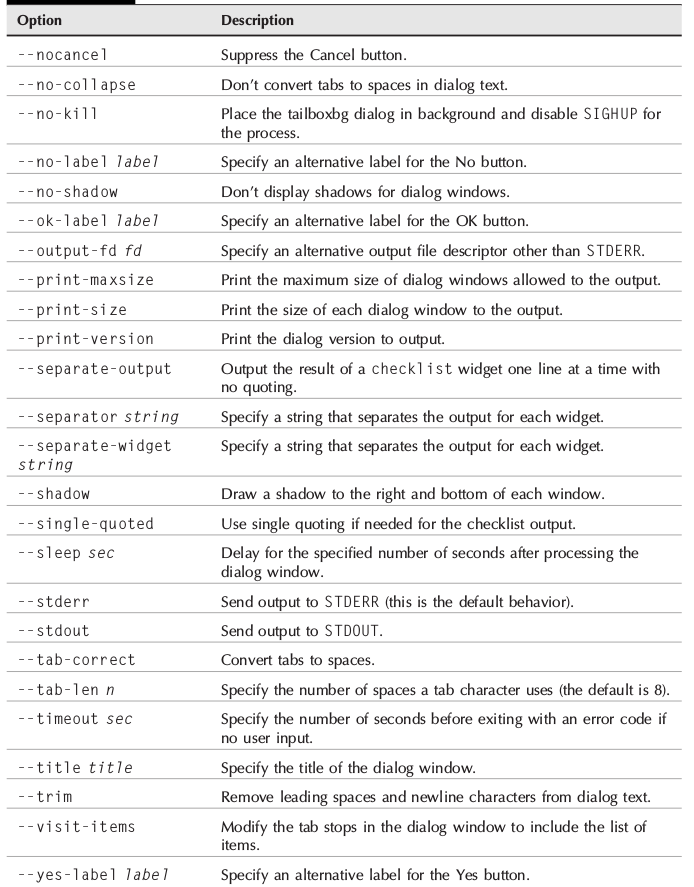
Dialog Option
You can use options to configure the widgets described above in more detail. Widgets that can be used together with widgets are as shown in the table below.

Using Dialogs in Scripts
When using the dialog command in the script, you need to pay attention to the following two things.
■ If there is a Cancel button or No button, exit code
■ Redirect STDERR to define output
Let's try to make the menu code created above using dialog.
|
#!/bin/bash
# using dialog to create a menu
temp=`mktemp -t test.XXXXXX`
temp2=`mktemp -t test2.XXXXXX`
function diskspace {
df -k > $temp
dialog --textbox $temp 20 60
}
function whoseon {
who > $temp
dialog --textbox $temp 20 50
}
function memusage {
cat /proc/meminfo > $temp
dialog --textbox $temp 20 50
}
while [ 1 ]
do
dialog --menu "Sys Admin Menu" 20 30 10 1 "Display disk space" 2
"Display users" 3 "Display memory usage" 0 "Exit" 2> $temp2
if [ $? -eq 1 ]
then
break
fi
selection=`cat $temp2`
case $selection in
1)
diskspace ;;
2)
whoseon ;;
3)
memusage ;;
0)
break ;;
*)
dialog --msgbox "Sorry, invalid selection" 10 30
esac
done
rm -f $temp 2> /dev/null
rm -f $temp2 2> /dev/null
|
Now we can let the user's input be selected graphically.
4. Using Graphics
For KDE or gnome desktop environments, more powerful X Window packages are available. There are kdialog and zenity. Let's find out how to use them depending on the desktop environment..
Kdialog widget in KDE environment
In KDE environment, Kdialog is included by default. You can use it similar to the dialog command. How to use the command is as follows.
usage phrase
kdialog display-options window-options arguments
Let's run the command as an example. (Example of using check list and radiolist)
kdialog --checklist "Items I need" 1 "Toothbrush" on 2 "Toothpaste" off 3 "Hair brush" on 4 "Deodorant" off 5 "Slippers" off
If you run it, you can see that the part set to on is activated. And when the above command is executed, it is not executed in the terminal session, but in the KDE environment.

And below is a table of window options available in KDE environment.
Let's take a look at an example used in a Kdialog script. How to use is the same as how to use diablog..
|
#!/bin/bash
# using kdialog to create a menu
temp=`mktemp -t temp.XXXXXX`
temp2=`mktemp -t temp2.XXXXXX`
function diskspace {
df -k > $temp
kdialog --textbox $temp 1000 10
}
function whoseon {
who > $temp
kdialog --textbox $temp 500 10
}
function memusage {
cat /proc/meminfo > $temp
kdialog --textbox $temp 300 500
}
while [ 1 ]
do
kdialog --menu "Sys Admin Menu" "1" "Display disk space" "2" "Display
users" "3" "Display memory usage" "0" "Exit" > $temp2
if [ $? -eq 1 ]
then
break
fi
selection=`cat $temp2`
case $selection in
1)
diskspace ;;
2)
whoseon ;;
3)
memusage ;;
0)
break ;;
*)
kdialog --msgbox "Sorry, invalid selection"
esac
done
|
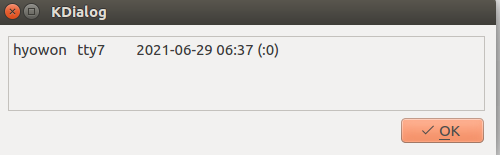
When you run it, the graphics feel better.

If you select Display users,
Using Graphics in the GNOME Environment
In gnome environment, the following two packages are supported to use graphics.
■ gdialog
■ zenity
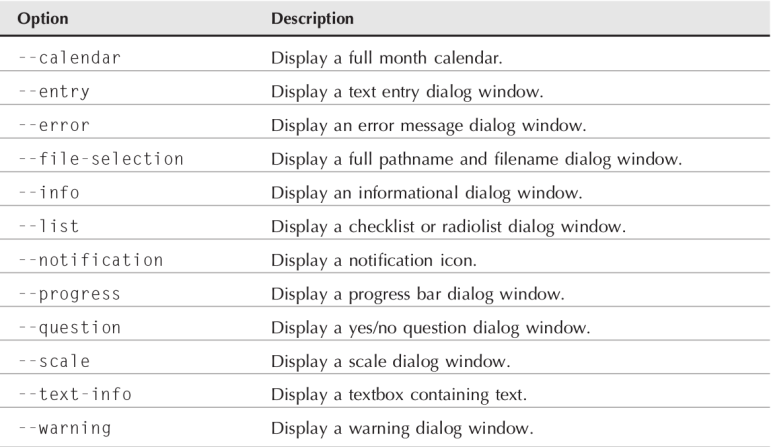
Using Zenity
The table below shows the widgets available in zenity and how to use them.
$zenity --calendar

When a date is selected, the value selected as STDOUT is returned.
Gtk-Message: GtkDialog mapped without a transient parent. This is discouraged.
June 29, 2021
Using Zenity for Scripts
The method of using zenity in scripts is slightly different from Kdialog. zenity does not change the option values used in kdialog or dialog. In order to use the menu in zenity in kdialog, you need to change the code as follows.
|
#!/bin/bash
# using zenity to create a menu
temp=`mktemp -t temp.XXXXXX`
temp2=`mktemp -t temp2.XXXXXX`
function diskspace {
df -k > $temp
zenity --text-info --title "Disk space" --filename=$temp
--width 750 --height 10
}
function whoseon {
who > $temp
zenity --text-info --title "Logged in users" --filename=$temp
--width 500 --height 10
}
function memusage {
cat /proc/meminfo > $temp
zenity --text-info --title "Memory usage" --filename=$temp
--width 300 --height 500
}
while [ 1 ]
do
zenity --list --radiolist --title "Sys Admin Menu" --column "Select"
--column "Menu Item" FALSE "Display disk space" FALSE "Display users"
FALSE "Display memory usage" FALSE "Exit" > $temp2
if [ $? -eq 1 ]
then
break
fi
selection=`cat $temp2`
case $selection in
"Display disk space")
diskspace ;;
"Display users")
whoseon ;;
"Display memory usage")
memusage ;;
Exit)
break ;;
*)
zenity --info "Sorry, invalid selection"
esac
done
|
'Shell Script' 카테고리의 다른 글
| 15 Regular Expression (1) | 2022.08.27 |
|---|---|
| 14 Introduction sed and gawk (1) | 2022.08.27 |
| 12 Making Function (5) | 2022.08.16 |
| 11 Script Control (0) | 2022.08.15 |
| 10 Data Expression (2) | 2022.08.13 |