In this post, we will learn about Daemonset Object in Kubernetes. There was a Replicationset as a similar object. The difference between these two is that ReplicationSet distributes pod deployments to nodes randomly by the scheduler. That is, two or more Pods may be deployed on one Node. It may not be deployed to all Nodes. In other words, it is an Object that distributes randomly and manages the number of operated Pods.
If you want to deploy only one Pod to one Node, you must use Daemonset Object. Unlike ReplicationSet, Daemonsset distributes directly without going through the scheduler. Because it does not go through the scheduler, one pod can be deployed to one node. The difference between the two is shown in the figure below.
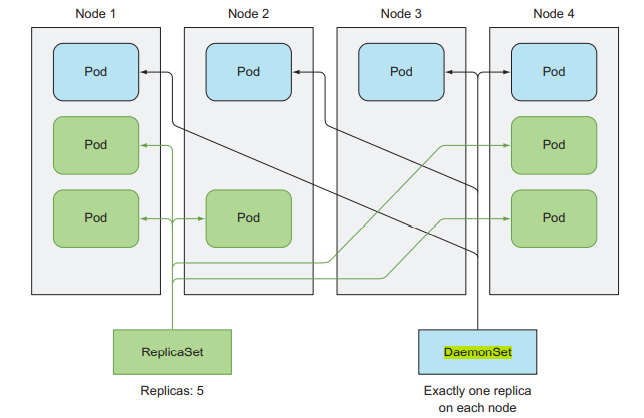
그림출처: Kubernetes In action
How is this possible? DaemonSet can designate a specific Node using a parameter called Node-Selector.
Then, create a daemonset.yaml file, enter the following contents and exit.
|
root@master-VirtualBox:~/test/daemonset# vi daemonset.yaml
apiVersion: apps/v1 ==> daemonset object is located in v1beta2
kind: DaemonSet ==>define deployed object
metadata:
name: ssd-monitor
spec:
selector:
matchLabels:
app: ssd-monitor ==>define label of target Pod
template:
metadata:
labels:
app: ssd-monitor
spec:
nodeSelector: ==> define which node is used
disk: ssd ==>if the node has disk: ssd Label then deploy pod in this node
containers:
- name: main
image: luksa/ssd-monitor
|
Now, let's deploy the daemonset and check the status.
|
root@master-VirtualBox:~/test/daemonset# kubectl apply -f daemonset.yaml
daemonset.apps/ssd-monitor created
root@master-VirtualBox:~/test/daemonset# kubectl get pod
No resources found in default namespace.
|
If you search with the et pod command, you can see that the pod has not been deployed. The reason is that no node has a Label value, so it has not been distributed. Now, let's enter a Label in the Node as shown below and search again.
|
root@master-VirtualBox:~/test/daemonset# kubectl get nodes ==> retrieve node infoNode
NAME STATUS ROLES AGE VERSION
master-virtualbox Ready control-plane 8d v1.24.3
worknode1-virtualbox Ready <none> 8d v1.24.3
worknode2-virtualbox Ready <none> 8d v1.24.3
root@master-VirtualBox:~/test/daemonset# kubectl label node worknode1-virtualbox disk=ssd
==> define node's labelnode1
node/worknode1-virtualbox labeled
root@master-VirtualBox:~/test/daemonset# kubectl get pod -o wide ==>retrieve Pod info
NAME READY STATUS RESTARTS AGE IP NODE NOMINATED NODE READINESS GATES
ssd-monitor-dqr2w 1/1 Running 0 29s 172.16.168.250 worknode1-virtualbox <none> <none>
oot@master-VirtualBox:~/test/daemonset# kubectl label nodes worknode1-virtualbox disk=hdd --overwrite
oot@master-VirtualBox:~/test/daemonset# kubectl get pod -o wide
NAME READY STATUS RESTARTS AGE IP NODE NOMINATED NODE READINESS GATES
ssd-monitor-dqr2w 1/1 Terminating 0 5m20s 172.16.168.250 worknode1-virtualbox <none> <none>
|
As above, although initially there are no Pods deployed from any Node. If you search after setting the label disk=ssd on Node1, you can see that a new Pod has been deployed. And if you change the Label value from ssd to hdd, you can see that the previously deployed Pod is deleted.
'Kubernetes' 카테고리의 다른 글
| [Cloud] 11. Using Kubernetes Volume (31) | 2023.02.11 |
|---|---|
| [Cloud] 10. Using Kubernetes Configmap (24) | 2023.02.10 |
| [Cloud] 8. Kubernetes kind of Prob and allocation of resource (41) | 2023.02.07 |
| [Cloud] 7. Deployment strategies (24) | 2023.02.05 |
| [Cloud] 6. Kubernetes Service deploy (24) | 2023.02.01 |