Hello neighbors. ^.^
It's been a while since I've had to focus on articles related to my major.
I would do it if it was extended in related fields.
Post on how to deploy Elastic Kubernetes Service, one of Amazon web service's products.
First, please create one using EC2 as the Baston host.
Connect from the host.
- Proceed with installing kubectl on the host using the command below.
using command
sh-4.2$ sudo curl --location -o /usr/local/bin/kubectl https://s3.us-west-2.amazonaws.com/amazon-eks/1.23.7/2022-06-29/bin/linux/amd64/kubectl
Then start downloading like below
|
sh-4.2$ sudo curl --location -o /usr/local/bin/kubectl https://s3.us-west-2.amazonaws.com/amazon-eks/1.23.7/2022-06-29/bin/linux/amd64/kubectl
% Total % Received % Xferd Average Speed Time Time Time Current
Dload Upload Total Spent Left Speed
100 44.4M 100 44.4M 0 0 12.1M 0 0:00:03 0:00:03 --:--:-- 12.1M
|
2. Make the downloaded file executable using the command below.
|
sudo chmod +x /usr/local/bin/kubectl
|
3.Use the command below to check if the version was installed correctly
|
sh-4.2$ kubectl version --short --client
Client Version: v1.23.7-eks-4721010
sh-4.2$
|
4. Download eksctl and unzip it using the command below.
using command
curl --location "https://github.com/weaveworks/eksctl/releases/latest/download/eksctl_$(uname -s)_amd64.tar.gz" | tar xz -C /tmp
excute result
|
% Total % Received % Xferd Average Speed Time Time Time Current
Dload Upload Total Spent Left Speed
0 0 0 0 0 0 0 0 --:--:-- --:--:-- --:--:-- 0
0 0 0 0 0 0 0 0 --:--:-- --:--:-- --:--:-- 0
100 30.7M 100 30.7M 0 0 12.9M 0 0:00:02 0:00:02 --:--:-- 31.7M
sh-4.2$
|
5. The path included in the Path to use the downloaded eksctl
Move it to /usr/local/bin.
using command
|
h-4.2$ sudo mv -v /tmp/eksctl /usr/local/bin
‘/tmp/eksctl’ -> ‘/usr/local/bin/eksctl’
|
6. Check the eksctl version using the command below.
|
sh-4.2$ eksctl version
0.139.0
sh-4.2$
|
7. Save the current EC2 Region and Shell environment variables and print them to the screen.
Using command
export AWS_REGION=$(curl --silent http://169.254.169.254/latest/meta-data/placement/region) && echo $AWS_REGION
|
h-4.2$ export AWS_REGION=$(curl --silent http://169.254.169.254/latest/meta-data/placement/region) && echo $AWS_REGION
ap-southeast-2
|
The last line in the output above shows the current Region.
8. Now let's deploy an EKS cluster with a managed node group of 3 nodes using the command below:
Using command
|
eksctl create cluster \
--name dev-cluster \
--nodegroup-name dev-nodes \
--node-type t3.medium \
--nodes 3 \
--nodes-min 1 \
--nodes-max 4 \
--managed \
--version 1.23 \
--region ${AWS_REGION}
|
It usually takes 10 to 20 minutes to create a cluster.
When configuring an EKS cluster using eksctl, by default one VPC, 3 Public Subnets and 3 Private Subnets are created..
excute result
|
2023-05-01 05:17:29 [ℹ] eksctl version 0.139.0
2023-05-01 05:17:29 [ℹ] using region ap-southeast-2
2023-05-01 05:17:29 [ℹ] setting availability zones to [ap-southeast-2c ap-southeast-2a ap-southeast-2b]
2023-05-01 05:17:29 [ℹ] subnets for ap-southeast-2c - public:192.168.0.0/19 private:192.168.96.0/19
2023-05-01 05:17:29 [ℹ] subnets for ap-southeast-2a - public:192.168.32.0/19 private:192.168.128.0/19
2023-05-01 05:17:29 [ℹ] subnets for ap-southeast-2b - public:192.168.64.0/19 private:192.168.160.0/19
2023-05-01 05:17:29 [ℹ] nodegroup "dev-nodes" will use "" [AmazonLinux2/1.23]
2023-05-01 05:17:29 [ℹ] using Kubernetes version 1.23
2023-05-01 05:17:29 [ℹ] creating EKS cluster "dev-cluster" in "ap-southeast-2" region with managed nodes
2023-05-01 05:17:29 [ℹ] will create 2 separate CloudFormation stacks for cluster itself and the initial managed nodegroup
2023-05-01 05:17:29 [ℹ] if you encounter any issues, check CloudFormation console or try 'eksctl utils describe-stacks --region=ap-southeast-2 --cluster=dev-cluster'
2023-05-01 05:17:29 [ℹ] Kubernetes API endpoint access will use default of {publicAccess=true, privateAccess=false} for cluster "dev-cluster" in "ap-southeast-2"
2023-05-01 05:17:29 [ℹ] CloudWatch logging will not be enabled for cluster "dev-cluster" in "ap-southeast-2"
2023-05-01 05:17:29 [ℹ] you can enable it with 'eksctl utils update-cluster-logging --enable-types={SPECIFY-YOUR-LOG-TYPES-HERE (e.g. all)} --region=ap-southeast-2 --cluster=dev-cluster'
2023-05-01 05:17:29 [ℹ]
2 sequential tasks: { create cluster control plane "dev-cluster",
2 sequential sub-tasks: {
wait for control plane to become ready,
create managed nodegroup "dev-nodes",
}
}
2023-05-01 05:17:30 [ℹ] deploying stack "eksctl-dev-cluster-cluster"
2023-05-01 05:30:31 [ℹ] building managed nodegroup stack "eksctl-dev-cluster-nodegroup-dev-nodes"
2023-05-01 05:30:31 [ℹ] deploying stack "eksctl-dev-cluster-nodegroup-dev-nodes"
2023-05-01 05:34:24 [✔] saved kubeconfig as "/home/ssm-user/.kube/config"
2023-05-01 05:34:24 [ℹ] no tasks
2023-05-01 05:34:24 [✔] all EKS cluster resources for "dev-cluster" have been created
2023-05-01 05:34:24 [ℹ] nodegroup "dev-nodes" has 3 node(s)
2023-05-01 05:34:24 [ℹ] node "ip-192-168-17-1.ap-southeast-2.compute.internal" is ready
2023-05-01 05:34:24 [ℹ] node "ip-192-168-50-81.ap-southeast-2.compute.internal" is ready
2023-05-01 05:34:24 [ℹ] node "ip-192-168-88-46.ap-southeast-2.compute.internal" is ready
2023-05-01 05:34:26 [ℹ] kubectl command should work with "/home/ssm-user/.kube/config", try 'kubectl get nodes'
2023-05-01 05:34:26 [✔] EKS cluster "dev-cluster" in "ap-southeast-2" region is ready
|
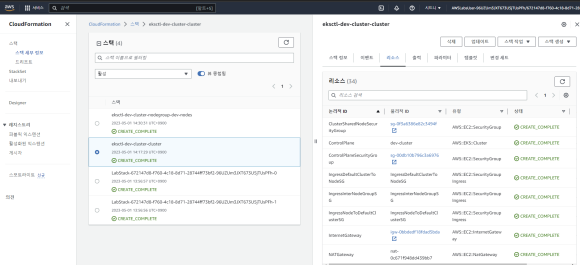
9. Now search for CloudFormation under Services in the AWS Console

10. If you click on Cloudformation. You can see it is creating a CloudFormation stack called eks-dev-clouste-cluster

11. Click eksctl-dev-cluster-cluster and click the Resources tab,
Check the created resources.
12. Now search for Elastic Kubernetes Service in the service search bar of the AWS Console and click on it.

13. Click dev-cluster to check the details of the resources being created.

14. Wait until the status at the bottom right of the screen becomes active or active.

15. Click the Compute tab in the middle of the screen to see the status of the associated node group

In the screen above, confirm that the number of nodes requested when creating eks is set to 3.
16. In the AWS Console, search for EC2 in the service search bar.
When you click EC2 service, select Auto scaling Group at the bottom left of the screen.
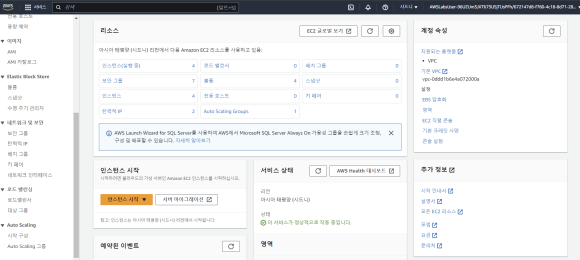
17,Click on a group whose name begins with eks to view details.
Confirm that the min and max values are set according to the command used when creating eks

18. Now, it returns to the ssh connection screen of the baston host that was connected at the beginning.
Execute the command below to check the information of the created node.
|
sh-4.2$ kubectl get nodes
NAME STATUS ROLES AGE VERSION
ip-192-168-17-1.ap-southeast-2.compute.internal Ready <none> 25m v1.23.17-eks-a59e1f0
ip-192-168-50-81.ap-southeast-2.compute.internal Ready <none> 25m v1.23.17-eks-a59e1f0
ip-192-168-88-46.ap-southeast-2.compute.internal Ready <none> 25m v1.23.17-eks-a59e1f0
sh-4.2$
|
Then, in the next article, I will post an article about distributing the test application through the eks created this time.
Have a happy and enjoyable day. ^.^
"이 포스팅은 쿠팡 파트너스 활동의 일환으로, 이에 따른 일정액의 수수료를 제공받습니다."
'AWS Cloud' 카테고리의 다른 글
| [Cloud] Using Amazon EKS Auto scaling (82) | 2023.05.18 |
|---|---|
| [Cloud] using AWS CI/CD -2 using Codepipeline (0) | 2023.05.14 |
| [Cloud] Using AWS CI/CD -3 create cluster and deploy by using EKS (0) | 2023.05.14 |
| [Cloud] AWS CI/CD Conf-1 create repogitory in EKS (18) | 2023.05.08 |
| [Cloud] Deploy Application in EKS (44) | 2023.05.07 |