In this article, you will learn about the types of networks provided by Docker and how to use them. Docker provides six default network methods. Check out the features and features of the next one.
Docker Network Type
1. Bridge Network is the default network type that is set if you do not define which driver to use when creating a container. Bridge Network is used when applications run in standalone containers. The structure is as follows.
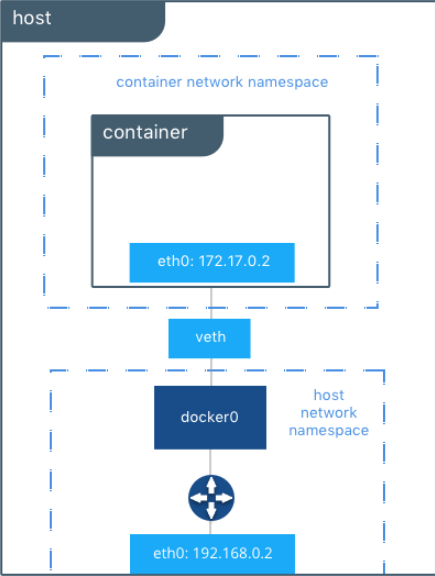
Bridge Network connects the Ethernet card of the host computer to the virtual Docker0, and this Docker 0 connects to the container's NIC, veth, to enable communication with the outside.
The bridge network structure is connected to the same bridge. This structure is useful when communicating only between containers. That is, it is used when not connected to a container connected to another bridge..
2.host network type is a case of using a standalone container by directly connecting to the host's Ethernet without separating the NameSpce between the container and the Docker host.
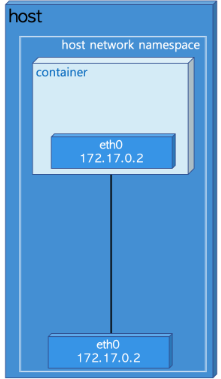
When using host network mode, the container's network shares the Host's namespace, and containers are not assigned their own IP addresses. For example, if you are running a container bound to port 80 and using host networking, applications in the container will be available on port 80 of the host IP address.
Host mode is useful for optimizing performance and situations where containers must handle a wide range of ports because Docker-0 (NAT) is not required.
3. The overlay network is useful when connecting multiple Docker Daemons, that is, when connecting Dockers on physically different computers and using them to communicate with each other. Its structure is as follows.

An Overlay Network sits (overlay) on top of a host's network, allowing secure communication between connected containers when encryption is enabled. .
4.ipvlan Network uses networks at L2 or L3 level to connect local containers to other networks's

It provides the function of separating and grouping containers into VLANs. Also, in IPVLAN mode, containers are not connected to Host Ethernet through Docker 0, but are directly connected to Host Ethernet. Therefore, the difference between containers in Host mode is that containers in Host mode do not have an IP and operate based on port, but all containers in IPVLAN mode have IP.
5.macvlan network requires a direct connection to the physical network for some applications, especially legacy applications or applications that monitor network traffic.

In this type of situation, you can use the macvlan network driver to assign a MAC address to each container's virtual network interface, making it look like a physical network interface directly connected to the physical network. IPVLAN Network is an IP-based VLAN, but you can think of macvlan as providing a MAC address-based VLAN function.
6. Network Plugins Network is a mode that uses the network drivers produced by each vendor.
Docker Network Command
Now, let's see how to configure and check using the Docker network command. After installing Docker, three networks are created: bridge, host, and none as shown in the figure below. command
- docker network ls

If you do not give a separate option when running the container, it will be connected to the bridge network. Now, let's look at the configuration information of the bridge network.
command
- docker network inspect bridge(Network name)
|
root@test-VirtualBox:~# docker network inspect bridge
[
{
"Name": "bridge", ==> network name
"Id": "03e5bdb50cb6796b96bd824605c2141574a5d380cd977652f607d1a9a8ba54d7",
"Created": "2022-07-07T13:57:51.186733306+09:00",
"Scope": "local",
"Driver": "bridge", ==> use bridge mode
"EnableIPv6": false,
"IPAM": {
"Driver": "default",
"Options": null,
"Config": [
{
"Subnet": "172.17.0.0/16", ==> bridge mode's range of IP
"Gateway": "172.17.0.1" ==> docker-0의 IP Address
}
]
},
"Internal": false,
"Attachable": false,
"Ingress": false,
"ConfigFrom": {
"Network": ""
},
"ConfigOnly": false,
"Containers": {},
"Options": {
},
"Labels": {}
}
]
root@test-VirtualBox:~#
|
As shown in the picture above, you can see detailed information with the inspect command. Now, let's create a network for testing.
command
- docker network cre3ate --driver <<network type>> <<network name>>
|
root@test-VirtualBox:~# docker network create --driver bridge test
674bfaad67f5df5c4efcc4a6d0d4c04482dccc0595c266e825197890e25c974c
root@test-VirtualBox:~#
root@test-VirtualBox:~#
root@test-VirtualBox:~#
root@test-VirtualBox:~# docker network ls
NETWORK ID NAME DRIVER SCOPE
03e5bdb50cb6 bridge bridge local
b31d94bf54a8 host host local
dc0909f33f46 none null local
674bfaad67f5 test bridge local
root@test-VirtualBox:~#
|
A network has been created whose network ID is 674bfaad67f5, the name is test, and the type is bridge. Now, let's run a docker and let the container run in the test network.
command
- docker run -itd --name my-engine --net test nginx
- -itd option is an option value to run the container in the background in interactive mode.
- --name my-engine means that the running container name is my-engine.
- --net test means to run the my-engine container in the test network.
- nginx defines the image of the container to be executed.
|
root@test-VirtualBox:~# docker run -itd --name my-engine --net test nginx
3973286939aa060312678ebce43a451f9f9a034ce12bd3fdff39868571f05be8
root@test-VirtualBox:~#
root@test-VirtualBox:~#
root@test-VirtualBox:~#
root@test-VirtualBox:~#
root@test-VirtualBox:~#
root@test-VirtualBox:~# docker ps
CONTAINER ID IMAGE COMMAND CREATED STATUS PORTS NAMES
3973286939aa nginx "/docker-entrypoint.…" 7 seconds ago Up 6 seconds 80/tcp my-engin
"NetworkSettings": {
"Bridge": "",
"SandboxID": "189618be16ff310bfe5a88589291fdfa16cb0aa0ffa6e1726d037bd04c9da62a",
"HairpinMode": false,
"LinkLocalIPv6Address": "",
"LinkLocalIPv6PrefixLen": 0,
"Ports": {
"80/tcp": null
},
"SandboxKey": "/var/run/docker/netns/189618be16ff",
"SecondaryIPAddresses": null,
"SecondaryIPv6Addresses": null,
"EndpointID": "",
"Gateway": "",
"GlobalIPv6Address": "",
"GlobalIPv6PrefixLen": 0,
"IPAddress": "",
"IPPrefixLen": 0,
"IPv6Gateway": "",
"MacAddress": "",
"Networks": {
"test": { ==>connect test network
"IPAMConfig": null,
"Links": null,
"Aliases": [
"3973286939aa"
],
"NetworkID": "674bfaad67f5df5c4efcc4a6d0d4c04482dccc0595c266e825197890e25c974c",
"EndpointID": "fa19ad676ec0331faef7b2a3931ff3f27789e983b0779a4dd882e72e33ebf123",
"Gateway": "172.18.0.1",
"IPAddress": "172.18.0.2", ==> my-engin's IP addresse
"IPPrefixLen": 16,
"IPv6Gateway": "",
"GlobalIPv6Address": "",
"GlobalIPv6PrefixLen": 0,
"MacAddress": "02:42:ac:12:00:02",
"DriverOpts": null
}
}
}
}
]
|
If you look at the network part above, you can see that the container is connected to the part called test. Let's remove the my-engine container from the test network.
command
- docker network disconnect test my-engine
==> connect the my-engine container to the bridge network
|
root@test-VirtualBox:~# docker network disconnect test my-engine ==> remove container
root@test-VirtualBox:~# docker inspect my-engine ==> check container info
"NetworkSettings": {
"Bridge": "",
"SandboxID": "189618be16ff310bfe5a88589291fdfa16cb0aa0ffa6e1726d037bd04c9da62a",
"HairpinMode": false,
"LinkLocalIPv6Address": "",
"LinkLocalIPv6PrefixLen": 0,
"Ports": {},
"SandboxKey": "/var/run/docker/netns/189618be16ff",
"SecondaryIPAddresses": null,
"SecondaryIPv6Addresses": null,
"EndpointID": "",
"Gateway": "",
"GlobalIPv6Address": "",
"GlobalIPv6PrefixLen": 0,
"IPAddress": "",
"IPPrefixLen": 0,
"IPv6Gateway": "",
"MacAddress": "",
"Networks": {}
}
}
]
|
If you look at the network part as shown in the picture above, you can see that there is no network information of the my-engine container. Now, let's connect the my-engine container to the bridge network again.
command
- docker network connect <<network name>> << container name>>
|
root@test-VirtualBox:~# docker network connect bridge my-engine ==> connect bridge network
root@test-VirtualBox:~# docker inspect my-engine ==> check container info
"Networks": {
"bridge": { ===> Netwok name
"IPAMConfig": {},
"Links": null,
"Aliases": [],
"NetworkID": "03e5bdb50cb6796b96bd824605c2141574a5d380cd977652f607d1a9a8ba54d7",
"EndpointID": "2653b6943d732d946ebf9cb2c59088b5ea61d9d0a545ecc8a8e5e0b1f859964b",
"Gateway": "172.17.0.1", ==> Docker-0 IP
"IPAddress": "172.17.0.2", ==> container's IP
"IPPrefixLen": 16,
"IPv6Gateway": "",
"GlobalIPv6Address": "",
"GlobalIPv6PrefixLen": 0,
"MacAddress": "02:42:ac:11:00:02",
"DriverOpts": {}
}
}
}
}
]
|
As above, you can see that the container is connected to the bridge network. Now, let's delete the last Network called Test that we created earlier.
command
- docker network rm <<network name>>
|
root@test-VirtualBox:~# docker network ls ==> check created network
NETWORK ID NAME DRIVER SCOPE
03e5bdb50cb6 bridge bridge local
b31d94bf54a8 host host local
dc0909f33f46 none null local
f4c6ae8f744e test bridge local
root@test-VirtualBox:~#
root@test-VirtualBox:~#
root@test-VirtualBox:~# docker network rm test ==>remove test network
test
root@test-VirtualBox:~#
root@test-VirtualBox:~# docker network ls ==>check created info
NETWORK ID NAME DRIVER SCOPE
03e5bdb50cb6 bridge bridge local
b31d94bf54a8 host host local
dc0909f33f46 none null local
|
As above, you can confirm that the test network will be deleted with the corresponding command. So today's post will end here.
'Docker' 카테고리의 다른 글
| [Cloud] 7. Docker Volumn (57) | 2023.06.01 |
|---|---|
| [Cloud] 6. Using Dockerfile (68) | 2023.05.31 |
| [Cloud] 5. Docker Registry (37) | 2023.05.26 |
| [Cloud] 3. Docker Basic Commands (43) | 2023.05.23 |
| [Cloud]2. Configuring your Docker environment (69) | 2023.05.20 |