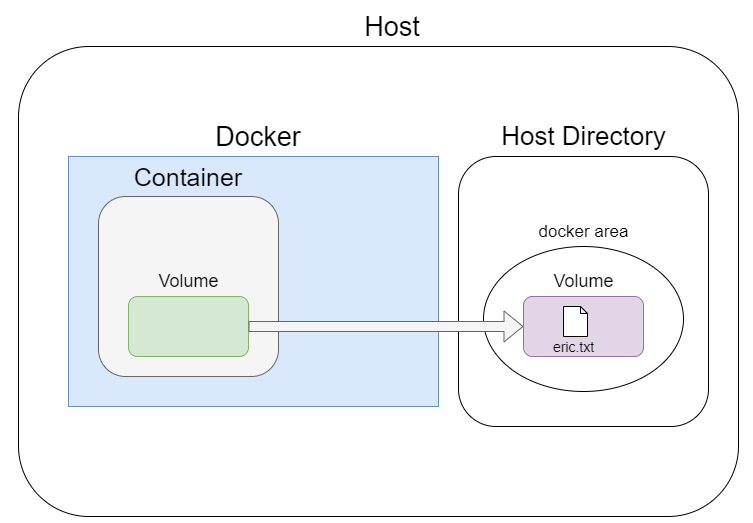
In this post, I will post about Volumn based on Docker. When Docker runs a container and creates a file in the container, all files are saved in the writable layer inside the container as Docker's default setting.
The operating environment in this structure causes many problems. For example, files created in a container cannot be accessed when the container is restarted or stopped.
In order to record data in the writable layer of the container, a storage driver to manage the file system is needed. Because the storage driver provides a union file system using the Linux kernel, due to this additional work, data is directly stored in the host file system. compared to recording. In terms of performance, it is weaker than using the Host file system.
So, even if the container is stopped in Docker, there are 3 ways to use the Host file system as follows.

Volumn
Volumes are a method of storing data in a specific area of the host file system managed by Docker. The default location on Linux is "/var/lib/docker/volumes/".

Now, let's see how to mount it on a container using Volumen and use it. First, the purpose of commands related to Volume is summarized as follows. - docker volume create : Creates a new volume.
- docker volume inspect : Inquires detailed information of the volume.
- docker volumn ls : Shows a list of created volumes.
- docker volumn prune: Delete unused local volumes.
- docker volumn rm : Deletes one or more volumes.
Now, let's create a volume using the above command and mount it in a container.
|
root@test-VirtualBox:~# docker volume create testvolumn ==> create new volumn
testvolumn
root@test-VirtualBox:~# docker volume inspect testvolumn ==> display created volumn info
[
{
"CreatedAt": "2022-07-19T09:55:33+09:00",
"Driver": "local",
"Labels": {},
"Mountpoint": "/var/lib/docker/volumes/testvolumn/_data", ==> the location of default mount
"Name": "testvolumn",
"Options": {},
"Scope": "local"
}
]
root@test-VirtualBox:~# docker run -it --name ubuntu --mount source=testvolumn,target=/testvolumndata ubuntu
root@debd7972d1db:/# cd testvolumndata/ ==> move to volumn area of container
root@debd7972d1db:/testvolumndata# ls -al ==> retrieve file
total 8
drwxr-xr-x 2 root root 4096 Jul 19 00:55 .
drwxr-xr-x 1 root root 4096 Jul 19 01:03 ..
root@debd7972d1db:/testvolumndata# touch testvolumn ==> create new file
root@debd7972d1db:/testvolumndata# ls -al ==> retrieve file
total 8
drwxr-xr-x 2 root root 4096 Jul 19 01:04 .
drwxr-xr-x 1 root root 4096 Jul 19 01:03 ..
-rw-r--r-- 1 root root 0 Jul 19 01:04 testvolumn
root@debd7972d1db:/testvolumndata# exit ==> switch from container to host machine
exit
root@test-VirtualBox:~# cd /var/lib/docker/volumes/testvolumn/_data/ => move from hot to docker area
root@test-VirtualBox:/var/lib/docker/volumes/testvolumn/_data# ls -al ==> retrieve file
total 8
drwxr-xr-x 2 root root 4096 7월 19 10:04 .
drwx-----x 3 root root 4096 7월 19 09:55 ..
-rw-r--r-- 1 root root 0 7월 19 10:04 testvolumn ==> retrieve file in container
root@test-VirtualBox:/var/lib/docker/volumes/testvolumn/_data#
|
Bind mount
Bind mounts are a way to store files anywhere other than the Docker area of the host system.

Comparing it to when using Volumen, there are the following disadvantages. - Bind mount depends on the directory structure of the host.
- Not managed by Docker.
- A security risk because the process in the container can change the host's file system. Bindmount can be used by using the -v option.
Its format is as follows. docker run -v <mount path on host machine>: <mount path on container> <image name>
|
root@test-VirtualBox:~/testvolumn# docker run -it -v /root/testvolumn/:/data/bindmount ubuntu
root@1a003817e339:/#
root@1a003817e339:/# pwd
/
root@1a003817e339:/# cd data/bindmount/ ==> move to path of mounted container
root@1a003817e339:/data/bindmount# ls -al
total 8
drwxr-xr-x 2 root root 4096 Jul 19 01:27 .
drwxr-xr-x 3 root root 4096 Jul 19 01:28 ..
root@1a003817e339:/data/bindmount# touch test ==> create test file
root@1a003817e339:/data/bindmount#
root@1a003817e339:/data/bindmount#
root@1a003817e339:/data/bindmount# ls ==>check file
test
root@1a003817e339:/data/bindmount#
root@1a003817e339:/data/bindmount# exit ==> switch from container to host
exit
root@test-VirtualBox:~/testvolumn# pwd
/root/testvolumn
root@test-VirtualBox:~/testvolumn# ls -al ==> check fcreated file of path
total 8
drwxr-xr-x 2 root root 4096 7월 19 10:28 .
drwx------ 6 root root 4096 7월 19 10:27 ..
-rw-r--r-- 1 root root 0 7월 19 10:28 test
root@test-VirtualBox:~/testvolumn#
|
tmpfs mounts
tmpfs mounts are used when there is no need to permanently store data to disk. tmpfs data is stored in the host's memory. Because of this feature, it is used when you want to preserve data in line with the life cycle of the tmfs mount container.

To configure tmpfs, you can use the -v option as in the above bind mount method. However, you can use it by mounting the source directory to the directory you want to use under /tmp/.
'Docker' 카테고리의 다른 글
| [Cloud] 6. Using Dockerfile (68) | 2023.05.31 |
|---|---|
| [Cloud] 4. Docker Network (89) | 2023.05.28 |
| [Cloud] 5. Docker Registry (37) | 2023.05.26 |
| [Cloud] 3. Docker Basic Commands (43) | 2023.05.23 |
| [Cloud]2. Configuring your Docker environment (69) | 2023.05.20 |