In this post, we will create an image using a Dockerfile. There are 3 ways to create an Image in Docker.
- Create a new image using the Tag command
- Create Image using Commit command in the running container
- Create a new image using Dockerfile.

Dockerfile is a text document composed of commands written by the user sequentially, and this document creates an image with the docker build command together with Context.
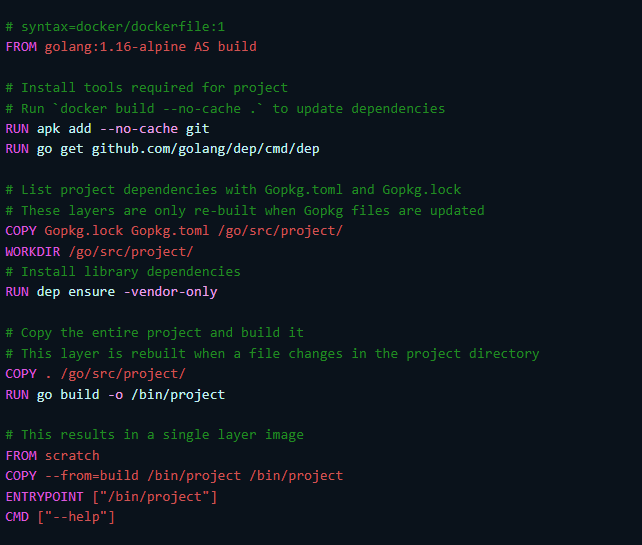
So let's learn more about Dockerfile. Below is a Sample Dockerfile. In Dockerfile, like other programming languages, comments are treated with #. And as shown in the figure, the start of Dockerfile should always start with FROM. If there is no FROM. If there is another command before FROM, image cannot be created.
Dockerfile is written in the order of <command><parameter>.
Looking at the first line in the picture above, FROM is the command, and golang:1.16-alpine is the parameter as shown in the picture below. If you interpret it, it means to create a version of the image to be newly created using golang:1.16-alpine.
|
FROM golang:1.16-alpine AS build
|
So let's take a look at some of the commands available in Docker and what they contain.
1.FROM: Defines which image to create a new image based on.
- FROM ubuntu ==> Create image from ubuntu
- FROM ubuntu:14.04 ==> Create image from ubuntu 14.04
2. MAINTAINER: Used to set the image creator information. The format is free.
- MAINTAINER michael, <abc.com> ==> Record the creator's name and email information
3. RUN: Used to define a script or statement to be executed after the image defined in FROM is created.
- RUN apt-get install -y nginx ==> This is the command to install nginx.
- RUN echo "Hello Tester" > /tmp/hello ==> Write the string Hello Tester to the file /tmp/hello.
4. CMD: After the container is started, the shell sends the command to be executed. Can only be used once in a Dockerfile do.
- CMD touch /tmp/test/test.txt Create text.txt file under test folder under /tmp
- It can also be used in the form of CMD ["executable file", "parameter 1", "parameter 2"].
- When used together with ENTRYPOINT, parameters after CMD are passed as input of ENTRYPOINT.
example: In the case below, "hi" after CMD is transmitted as ENTRYPOINT "echo" command and hi is output. ENTRYPOINT ["echo"] CMD ["hI"]
5. ENTRYPOINT: Like CMD, it sends a command to be executed to the container's shell. in Dockerfile Can only be used once.
- ENTRYPONT touch /tmp/text ==> Creates a text file under the /tmp folder.
- ENTRYPONT ["/tmp/test.sh", "--hi","test"] ==> Pass hi and test as parameters to test.sh file.
6. EXPOSE: Set the port number to connect with the host.
- EXPOSE 80 ==> Connect the host using port 80
- EXPOSE 443 ==> Connect host using port 443
7. ENV : Set the ENV environment variable. Environment variables set to ENV are applied to RUN, CMD, and ENTRYPOINT.
- ENV TEST 1254 ==> Set the value to 1254 in the variable test.
- ENV PATH /var/bin:$PATH
8. ADD: Used to add files to the image. If the file is compressed, it is automatically decompressed.
- ADD <Location to copy> Specify in the format of <Path where the file is to be located in the image>.
- ADD *.txt /var/ ==> Copy all txt files under /var/ directory.
9. COPY: Add files to the image just like ADD. However, COPY does not automatically decompress compressed files like ADD.
- COPY *.txt /var/ ==> Copies all txt files under /VAR/ directory.
10. VOLUME: Specifies the volume in which to store the container's data. You must use the -v option to connect to a directory on the host.
- VOLUMN /data ==> Designate the /data folder as the data volume.
- docker run -v /root/data:/data example ==> Link the /data folder in the container named example to /root/data on the host.
11. USER: Defines the user who will execute the command. This command applies to RUN, CMD, and ENTRYPOINT.
- It is specified in the format of USER <user name> and is applied from the line after USER in the Dockerfile.
12. WORKDIR: Set the directory where the RUN, CMD, ENTRYPOINT commands will be executed.
-WORKDIR /var/www ==> Use /var/www as WORKDIR.
13. ONBUILD: Defines the command to be executed when another image is created with the function of the created image.
- Use ONBUILD <Dockerfile command> <parameter of Dockerfile command> format.
- ONBUILD ADD text.txt /var/text.txt ==> Add text.txt file under /var/ So let's create an image using some of the commands we learned above.
- Create a dockerfile directory using the mkdir command
- After moving to the dockerfile folder, create a dockerfile and enter the following contents
|
root@test-VirtualBox:~# mkdir dockerfile
root@test-VirtualBox:~# cd dockerfile/
root@test-VirtualBox:~/dockerfile# vi dockerfile
FROM ubuntu
RUN mkdir /myvol
RUN echo "hello world" > /myvol/greeting
VOLUME /myvol
CMD ["/bin/bash"]
|
Create a new image with docker build -t command
|
root@test-VirtualBox:~/dockerfile# docker build -t mypc/volumn:1.0 .
Sending build context to Docker daemon 2.048kB
Step 1/5 : FROM ubuntu
latest: Pulling from library/ubuntu
405f018f9d1d: Pull complete
Digest: sha256:b6b83d3c331794420340093eb706a6f152d9c1fa51b262d9bf34594887c2c7ac
Status: Downloaded newer image for ubuntu:latest
---> 27941809078c
Step 2/5 : RUN mkdir /myvol
---> Running in 91844c0695da
Removing intermediate container 91844c0695da
---> 12be4e294140
Step 3/5 : RUN echo "hello world" > /myvol/greeting
---> Running in 1a9c0c694905
Removing intermediate container 1a9c0c694905
---> af24038dee22
Step 4/5 : VOLUME /myvol
---> Running in e21033ff99fe
Removing intermediate container e21033ff99fe
---> bbb916ebd573
Step 5/5 : CMD ["/bin/bash"]
---> Running in af938f990f92
Removing intermediate container af938f990f92
---> ec55bd1a2b1d
Successfully built ec55bd1a2b1d
Successfully tagged mypc/volumn:1.0
root@test-VirtualBox:~/dockerfile#
|
let's run the created container, go to the volume, and look up the file.
|
root@test-VirtualBox:~# docker run -it mypc/volumn:1.0 /bin/bash
root@f1be2082712b:/# exit
root@test-VirtualBox:~# docker volume ls
DRIVER VOLUME NAME
local 49a13c64adba76b8a415bdf45ad282295bc360f83500e54100a17087ca3abf05
local f0f3f2a3b18b5be55b5096116edafeb9dfb517c2f0077405519de3f588173632
local f9fd8be4debaf0660d6c3c29a49a5c02aa66d5b6f336d7a09be11aba31c67432
local volumn1
root@test-VirtualBox:/var/lib/docker/volumes# cd /var/lib/docker/volumes && ls -al
total 48
drwx-----x 6 root root 4096 7월 18 15:21 .
drwx--x--- 13 root root 4096 7월 18 08:42 ..
drwx-----x 3 root root 4096 7월 18 09:50 49a13c64adba76b8a415bdf45ad282295bc360f83500e54100a17087ca3abf05
brw------- 1 root root 8, 5 7월 18 08:42 backingFsBlockDev
drwx-----x 3 root root 4096 7월 14 14:33 f0f3f2a3b18b5be55b5096116edafeb9dfb517c2f0077405519de3f588173632
drwx-----x 3 root root 4096 7월 18 15:21 f9fd8be4debaf0660d6c3c29a49a5c02aa66d5b6f336d7a09be11aba31c67432
-rw------- 1 root root 32768 7월 18 15:21 metadata.db
drwx-----x 3 root root 4096 7월 14 14:48 volumn1
|
'Docker' 카테고리의 다른 글
| [Cloud] 7. Docker Volumn (57) | 2023.06.01 |
|---|---|
| [Cloud] 4. Docker Network (89) | 2023.05.28 |
| [Cloud] 5. Docker Registry (37) | 2023.05.26 |
| [Cloud] 3. Docker Basic Commands (43) | 2023.05.23 |
| [Cloud]2. Configuring your Docker environment (69) | 2023.05.20 |