안녕하세요 이웃님들 ^.^
이번 포스팅은 kUBENETIS Cluster를 AWS Cloud에 구축 하는 방법에 대해서 포스팅을 해보려고 합니다.
우선 Cluster 구성은 Controller Node 1개와 Worker Node 2개를 VM기반으로 구성 하는 방법 입니다.
그럼 시작해 볼까요?
1. Node VM(Virtual machine) 준비
Kubernetes 클러스터 구성을 위한 Node VM들을 준비를 해야 합니다.
모든 VM 노드는 인터넷에 연결되어 있어야 하고 , Public IP Address를 가진 구성으로 만듭니다.
구성할 Node들의 정보는 아래와 같습니다.
Node nameOSNode typeVPCPublic IPStorage
| k8s-controlplane | Ubuntu Server 22.04 LTS | t3.medium | Default VPC | Enable | 20GiB |
| k8s-node01 | Ubuntu Server 22.04 LTS | t3.medium | Default VPC | Enable | 20GiB |
| k8s-node02 | Ubuntu Server 22.04 LTS | t3.medium | Default VPC | Enable | 20GB |
Node VM을 구성하기 위해 AWS Web console에 본인의 계정으로 로그인을 하고.
검색창에서 EC2를 검색 한후 클릭 합니다.
ec2에서 Launch and Instance를 클릭해서 위의 Spec에 맞는 VM 3개를 생성 합니다.
아래는 k8s-controlplane VM의 생성 절차 입니다.
나머지 2개의 VM은 아래의 절차를 참고 하여 위의 Spec에 맞는 VM을 생성을 합니다.
1) VM의 이름과 OS Image를 선택 합니다.

2) 본인이 구성하려고 하는 Application의 사양에 맞는 Instance Type을선택 합니다.
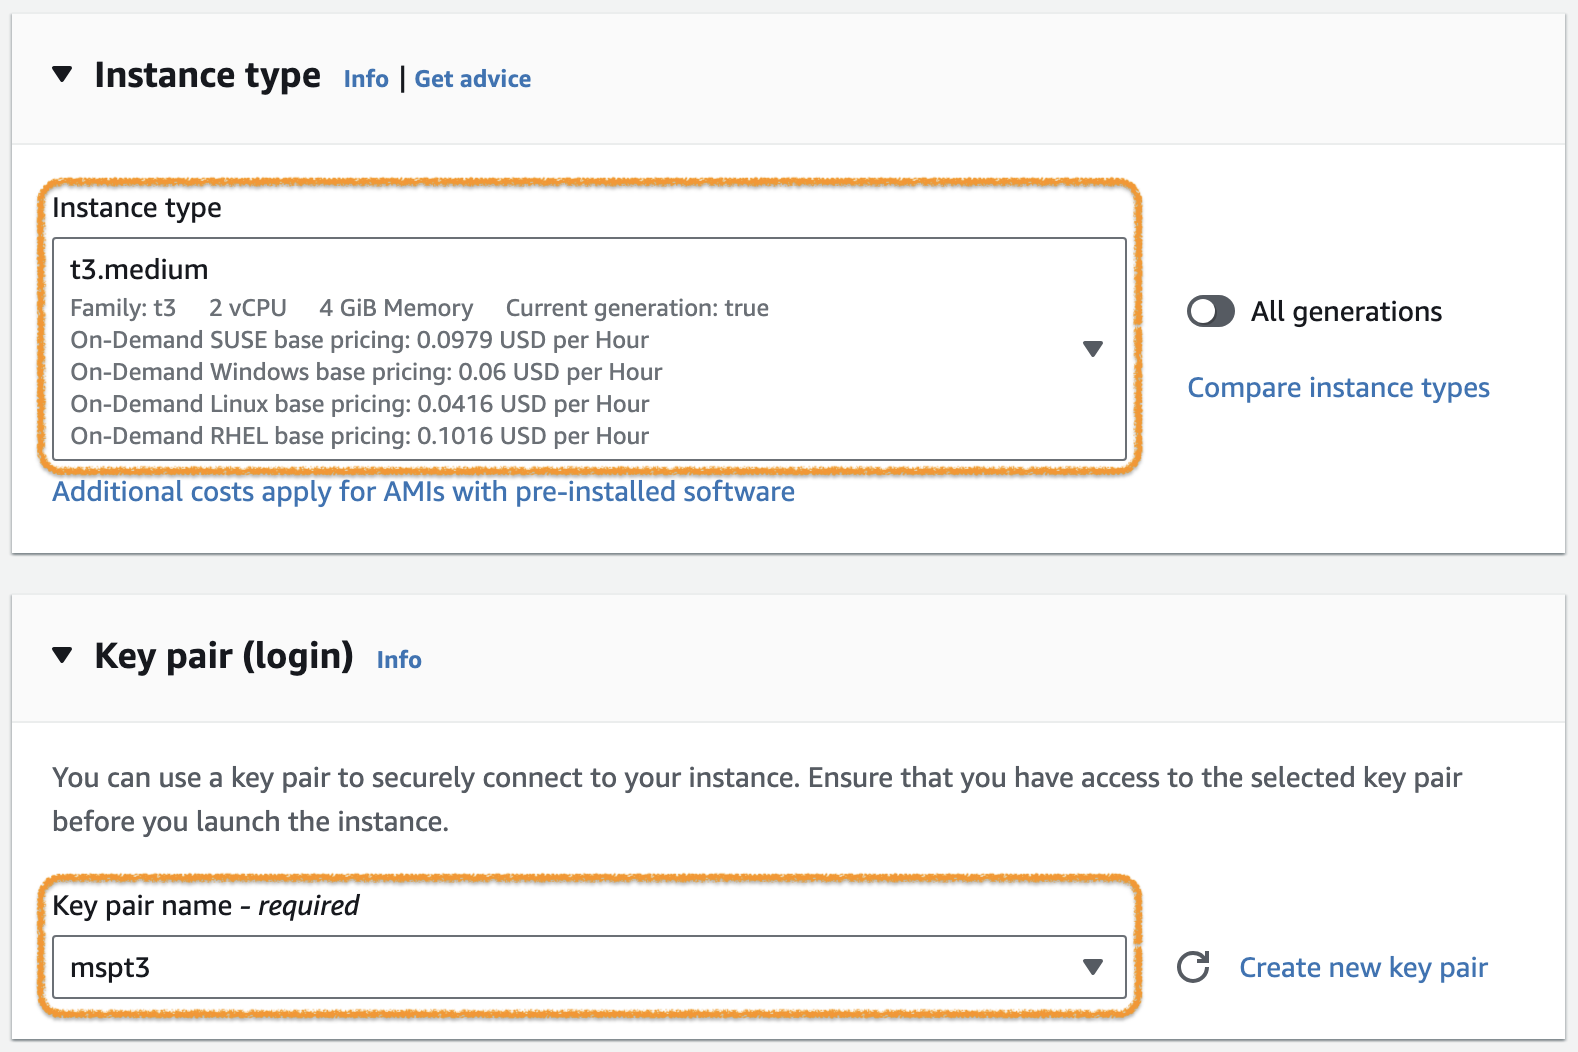
3) Network Setting에서 VPC는 Default, Subnet은 가용 가능한 AZ중 하나를 선택 하고
ssh만 혀용해주는 Security group을 아래와 같이 선택을 합니다.

4) Instance의 Storage를 Application의 용량에 맞에 설정을 합니다.

2. Container runtime 설치
Noce VM이 준비가 되었다면, 이제 Container를 제어 할수있는 Container Runtime을 설치를 해야 합니다.
여기서는 containerd를 설치하여 보겠습니다.
아래의 절차는 준비된 3개의 Node VM에 모두 설치를 해야 합닏
각 노드로 ssh 접속 후 다음 절차를 진행하세요.
※ 상세 내용은 Container Runtimes를 참조.
1) Network 설정
Network Plugin Requirements에 따라 iptables proxy 설정을 해야 합니다.
아래 명령어를 실행합니다.
cat <<EOF | sudo tee /etc/modules-load.d/k8s.conf
overlay
br_netfilter
EOF

sudo modprobe overlay
sudo modprobe br_netfilter

# sysctl params required by setup, params persist across reboots
cat <<EOF | sudo tee /etc/sysctl.d/k8s.conf
net.bridge.bridge-nf-call-iptables  = 1
net.bridge.bridge-nf-call-ip6tables = 1
net.ipv4.ip_forward                 = 1
EOF

# Apply sysctl params without reboot
sudo sysctl --system
※ 세부 내용은 아래의 링크를 참고 하세요
Install and configure prerequisite
2) containerd 설치
containerd를 아래와 같이 apt package로 설치합니다.
# Add Docker's official GPG key:
sudo apt-get update
sudo apt-get install -y ca-certificates curl gnupg
sudo install -m 0755 -d /etc/apt/keyrings
curl -fsSL https://download.docker.com/linux/ubuntu/gpg | sudo gpg --dearmor -o /etc/apt/keyrings/docker.gpg
sudo chmod a+r /etc/apt/keyrings/docker.gpg

# Add the repository to Apt sources:
echo \
  "deb [arch=$(dpkg --print-architecture) signed-by=/etc/apt/keyrings/docker.gpg] https://download.docker.com/linux/ubuntu \
  $(. /etc/os-release && echo "$VERSION_CODENAME") stable" | \
  sudo tee /etc/apt/sources.list.d/docker.list > /dev/null
sudo apt-get update
sudo apt-get install -y containerd.io
※ 관련 문서는 아래를 참고 하시기 바랍니다.
Getting started with containerd - Installing containerd - Option 2: From apt-get , Install Docker Engine on Ubuntu
3) containerd 설정
systemd를 cgroup driver로 사용하고, CRI Support를 위해 다음과 같이 containrd의 설정을 변경합니다.
먼저 config.toml 파일을 생성합니다. (overwrite)
containerd config default | sudo tee /etc/containerd/config.toml
※ containerd 의 default config.를 config.toml 파일에 기록
Containerd의 default config.에서는 SystemdCgroup = false로 되어있기 때문에 이 부분을 변경합니다.
sudo sed -i 's/SystemdCgroup = false/SystemdCgroup = true/g' /etc/containerd/config.toml
결과는 아래와 같아야 합니다.
- disabled_plugins 에 cri가 포함되어 있지 않다.
- SystemdCgroup = true ( [plugins."io.containerd.grpc.v1.cri".containerd.runtimes.runc.options] 부분 )
$ sudo cat /etc/containerd/config.toml | grep disabled_plugins
disabled_plugins = []
$ sudo cat /etc/containerd/config.toml | grep SystemdCgroup
            SystemdCgroup = true
설정을 변경했으면 아래 명령어를 실행해서 containerd 를 재시작합니다.
sudo systemctl restart containerd
3. kubeadm, kubelet, kubectl 설치
그럼 이제 Node VM에 Kubenetis를 구동하기 위해 아래의 3가지 Package를 각 VM에 설치를 합니다.
설치 절차는 모두 동일 합니다.
- kubeadm : Kubernetes 클러스터 관리 도구
- kubelet : Kubernetes node component로 Pod/Container의 동작을 관리
- kubectl: Kubernetes CLI 도구
아래의 명령어를 각 vm에서 실행을 합니다.
※ 아래 명령어는 Kubernetes v1.29기준 입니다.
sudo apt-get update
# apt-transport-https may be a dummy package; if so, you can skip that package
sudo apt-get install -y apt-transport-https ca-certificates curl gpg

curl -fsSL https://pkgs.k8s.io/core:/stable:/v1.29/deb/Release.key | sudo gpg --dearmor -o /etc/apt/keyrings/kubernetes-apt-keyring.gpg

# This overwrites any existing configuration in /etc/apt/sources.list.d/kubernetes.list
echo 'deb [signed-by=/etc/apt/keyrings/kubernetes-apt-keyring.gpg] https://pkgs.k8s.io/core:/stable:/v1.29/deb/ /' | sudo tee /etc/apt/sources.list.d/kubernetes.list

sudo apt-get update
sudo apt-get install -y kubelet kubeadm kubectl
sudo apt-mark hold kubelet kubeadm kubectl
※ 세부 내용은 아래 링크를 참고 하시기 바랍니다.
Installing kubeadm, kubelet and kubectl
4. Control-plane node 구성
3개의 패키지가 모든 VM에 설치가 되었다면 이제 Controller Node로 사용할 Node VM에서 아래의 절차를 진행 합니다.
Worker Node VM에서 진행을 하면 안됩니다.
1) 먼저 Control-plane node의 IP Address 확인을 아래의 명령어를 통해 실행 합니다.
(AWS EC2인 경우 Private IPv4 addresses)
$ ip route show
default via 172.31.16.1 dev ens5 proto dhcp src 172.31.30.145 metric 100
...
※ 위와 같이 출력되면 172.31.30.145 가 이 Node의 IP Address 임.
2) 아래 명령어를 실행하여 Control-plane node에 Control-plane component들을 설치하고 실행합니다.
sudo kubeadm init --apiserver-advertise-address=172.31.30.145 --pod-network-cidr=10.244.0.0/16
※ 각 파라메터에 대한 설명은 아래를 참고 하시기 바랍니다.
--apiserver-advertise-address : Control-plane node의 IP Address
--pod-network-cidr : 사용할 Network add-on에 따라 설정함. (위 예시는 Flannel 을 위한 구성입니다.)
아래는 실행결과 예시입니다.
$ sudo kubeadm init --apiserver-advertise-address=172.31.30.145 --pod-network-cidr=10.244.0.0/16
[init] Using Kubernetes version: v1.29.0
[preflight] Running pre-flight checks
[preflight] Pulling images required for setting up a Kubernetes cluster
[preflight] This might take a minute or two, depending on the speed of your internet connection
[preflight] You can also perform this action in beforehand using 'kubeadm config images pull'
W0112 08:14:02.746414    7047 checks.go:835] detected that the sandbox image "registry.k8s.io/pause:3.6" of the container runtime is inconsistent with that used by kubeadm. It is recommended that using "registry.k8s.io/pause:3.9" as the CRI sandbox image.
[certs] Using certificateDir folder "/etc/kubernetes/pki"
[certs] Generating "ca" certificate and key
[certs] Generating "apiserver" certificate and key
[certs] apiserver serving cert is signed for DNS names [ip-172-31-30-145 kubernetes kubernetes.default kubernetes.default.svc kubernetes.default.svc.cluster.local] and IPs [10.96.0.1 172.31.30.145]
[certs] Generating "apiserver-kubelet-client" certificate and key
[certs] Generating "front-proxy-ca" certificate and key
[certs] Generating "front-proxy-client" certificate and key
[certs] Generating "etcd/ca" certificate and key
[certs] Generating "etcd/server" certificate and key
[certs] etcd/server serving cert is signed for DNS names [ip-172-31-30-145 localhost] and IPs [172.31.30.145 127.0.0.1 ::1]
[certs] Generating "etcd/peer" certificate and key
[certs] etcd/peer serving cert is signed for DNS names [ip-172-31-30-145 localhost] and IPs [172.31.30.145 127.0.0.1 ::1]
[certs] Generating "etcd/healthcheck-client" certificate and key
[certs] Generating "apiserver-etcd-client" certificate and key
[certs] Generating "sa" key and public key
[kubeconfig] Using kubeconfig folder "/etc/kubernetes"
[kubeconfig] Writing "admin.conf" kubeconfig file
[kubeconfig] Writing "super-admin.conf" kubeconfig file
[kubeconfig] Writing "kubelet.conf" kubeconfig file
[kubeconfig] Writing "controller-manager.conf" kubeconfig file
[kubeconfig] Writing "scheduler.conf" kubeconfig file
[etcd] Creating static Pod manifest for local etcd in "/etc/kubernetes/manifests"
[control-plane] Using manifest folder "/etc/kubernetes/manifests"
[control-plane] Creating static Pod manifest for "kube-apiserver"
[control-plane] Creating static Pod manifest for "kube-controller-manager"
[control-plane] Creating static Pod manifest for "kube-scheduler"
[kubelet-start] Writing kubelet environment file with flags to file "/var/lib/kubelet/kubeadm-flags.env"
[kubelet-start] Writing kubelet configuration to file "/var/lib/kubelet/config.yaml"
[kubelet-start] Starting the kubelet
[wait-control-plane] Waiting for the kubelet to boot up the control plane as static Pods from directory "/etc/kubernetes/manifests". This can take up to 4m0s
[apiclient] All control plane components are healthy after 7.002440 seconds
[upload-config] Storing the configuration used in ConfigMap "kubeadm-config" in the "kube-system" Namespace
[kubelet] Creating a ConfigMap "kubelet-config" in namespace kube-system with the configuration for the kubelets in the cluster
[upload-certs] Skipping phase. Please see --upload-certs
[mark-control-plane] Marking the node ip-172-31-30-145 as control-plane by adding the labels: [node-role.kubernetes.io/control-plane node.kubernetes.io/exclude-from-external-load-balancers]
[mark-control-plane] Marking the node ip-172-31-30-145 as control-plane by adding the taints [node-role.kubernetes.io/control-plane:NoSchedule]
[bootstrap-token] Using token: ev57z0.770ldkwdxb8if9bn
[bootstrap-token] Configuring bootstrap tokens, cluster-info ConfigMap, RBAC Roles
[bootstrap-token] Configured RBAC rules to allow Node Bootstrap tokens to get nodes
[bootstrap-token] Configured RBAC rules to allow Node Bootstrap tokens to post CSRs in order for nodes to get long term certificate credentials
[bootstrap-token] Configured RBAC rules to allow the csrapprover controller automatically approve CSRs from a Node Bootstrap Token
[bootstrap-token] Configured RBAC rules to allow certificate rotation for all node client certificates in the cluster
[bootstrap-token] Creating the "cluster-info" ConfigMap in the "kube-public" namespace
[kubelet-finalize] Updating "/etc/kubernetes/kubelet.conf" to point to a rotatable kubelet client certificate and key
[addons] Applied essential addon: CoreDNS
[addons] Applied essential addon: kube-proxy

Your Kubernetes control-plane has initialized successfully!

To start using your cluster, you need to run the following as a regular user:

  mkdir -p $HOME/.kube
  sudo cp -i /etc/kubernetes/admin.conf $HOME/.kube/config
  sudo chown $(id -u):$(id -g) $HOME/.kube/config

Alternatively, if you are the root user, you can run:

  export KUBECONFIG=/etc/kubernetes/admin.conf

You should now deploy a pod network to the cluster.
Run "kubectl apply -f [podnetwork].yaml" with one of the options listed at:
  https://kubernetes.io/docs/concepts/cluster-administration/addons/

Then you can join any number of worker nodes by running the following on each as root:

kubeadm join 172.31.30.145:6443 --token ev57z0.770ldkw... \
	--discovery-token-ca-cert-hash sha256:3d98992e...
3) kubectl 설정을 위해 다음 명령어를 실행합니다.
mkdir -p $HOME/.kube
sudo cp -i /etc/kubernetes/admin.conf $HOME/.kube/config
sudo chown $(id -u):$(id -g) $HOME/.kube/config
※ kubectl CLI를 편하게 사용하기 위려면 아래의 링크를 참고 하시기 바랍니다
4) 다음은 pod network add-on 을 설치합니다. ( 아래 예시는 Flannel )
kubectl apply -f https://github.com/flannel-io/flannel/releases/latest/download/kube-flannel.yml
5) 정상적으로 준비가 된 경우 아래와 같이 표시됩니다.
$ kubectl get po -A
NAMESPACE      NAME                                       READY   STATUS    RESTARTS   AGE
kube-flannel   kube-flannel-ds-z97gc                      1/1     Running   0          2m1s
kube-system    coredns-76f75df574-276ns                   1/1     Running   0          5m3s
kube-system    coredns-76f75df574-swj5p                   1/1     Running   0          5m3s
kube-system    etcd-ip-172-31-26-107                      1/1     Running   0          5m17s
kube-system    kube-apiserver-ip-172-31-26-107            1/1     Running   0          5m17s
kube-system    kube-controller-manager-ip-172-31-26-107   1/1     Running   0          5m17s
kube-system    kube-proxy-x6zmg                           1/1     Running   0          5m3s
kube-system    kube-scheduler-ip-172-31-26-107            1/1     Running   0          5m18s
여기까지 하면 Control-plane node는 준비가 됐습니다.
6) 다음 단계로 넘어가기 전에 API Server 접근을 위해서 AWS의 콘솔에서
Control-plane node의 Security Group에 다음 규칙을 추가해주세요.
※ TypeProtocolPort rangeSource
| Custom TCP | TCP | 6443 | 172.31.0.0/16 |
※ Source의 IP Range는 (Worker) node의 IP Range 입니다. 관련 내용은 아래 링크된 문서를 참고 하세요
관련 문서 : Initializing your control-plane node
관련 문서 : kubeadm init
관련 문서 : Deploying flannel manually
5. (Worker) node 구성
이제 Controller Node VM 설정은 완료가 되었고, Worker Node에 설정을 진행해 보겠습니다.
kubeadm을 이용해서 (Worker) node에 필요한 구성을 하고, K8s cluster에 Join 시킵니다.
앞 절차에서 생성된 kubeadm join ... 명령어를 저장해 두었으면 그대로 실행 하고 그렇지 않으면
아래의 절차를 진행 합니다.
- api-server-endpoint
- token
- discovery-token-ca-cert-hash
1) Control-plane node에서 다음과 같이 확인합니다.
api-server-endpoint
$ kubectl cluster-info
Kubernetes control plane is running at https://172.31.30.145:6443
CoreDNS is running at https://172.31.30.145:6443/api/v1/namespaces/kube-system/services/kube-dns:dns/proxy

To further debug and diagnose cluster problems, use 'kubectl cluster-info dump'.
172.31.30.145:6443 이 API Server의 endpoint 입니다.
2) token 값을 아래의 명령어로 확인을 합니다.
$ kubeadm token list
TOKEN                     TTL         EXPIRES                USAGES                   DESCRIPTION                                                EXTRA GROUPS
ev57z0.770ldkw...   21h         2024-01-16T05:07:18Z   authentication,signing   The default bootstrap token generated by 'kubeadm init'.   system:bootstrappers:kubeadm:default-node-token
3) discovery-token-ca-cert-hash 값 찾기
$ openssl x509 -pubkey -in /etc/kubernetes/pki/ca.crt | openssl rsa -pubin -outform der 2>/dev/null | openssl dgst -sha256 -hex | sed 's/^.* //'
3d98992e...
※ 3d98992e... 이 CA Cert 의 Hash 입니다.
4) 위의 정보를 조합하여 아래와 같이 kubeadm join 명령어를 실행합니다.
sudo kubeadm join 172.31.30.145:6443 --token ev57z0.770ldkw... --discovery-token-ca-cert-hash sha256:3d98992e...
※ Worker Node에서 위의 명령을 실행을 합니다.
5) Join 후에 Node를 조회하면 아래와 같이 조회를 해 봅니다.
6. Helm 설치
이제 모든 환경은 구성이 되었고 kubernetest 패키지 관리자인 helm을 설치를 진행 합니다.
1)kubectl CLI를 위한 설정이 된 곳(앞의 과정대로 진행하셨다면 Control-plane node)에서 다음과 같이 설치합니다.
curl -LO https://get.helm.sh/helm-v3.13.3-linux-amd64.tar.gz
tar -zxvf helm-v3.13.3-linux-amd64.tar.gz
sudo mv linux-amd64/helm /usr/local/bin/helm
2)설치 확인은 아래와 같이 해보시면 됩니다.
$ helm version
version.BuildInfo{Version:"v3.13.3", GitCommit:"c8b948945e52abba22ff885446a1486cb5fd3474", GitTreeState:"clean", GoVersion:"go1.20.11"}
※ helm에 관련된 세부 정보는 아래 링크를 참고 하시기 바랍니다.
nstalling Helm - From the binary releases
7. Ingress controller 설치 및 구성
이제 kubernetis의 서비스 객체중 하나인 ingress를 설치해 봅시다.
1)Ingress controller로 Nginx를 아래의 명령을 통해 설치를 합니다.
helm install ingress-nginx ingress-nginx \
  --repo https://kubernetes.github.io/ingress-nginx \
  --namespace ingress-nginx --create-namespace \
  --set controller.service.type=NodePort \
  --set controller.service.nodePorts.http=30000 \
  --set controller.service.nodePorts.https=30001
※ ingress-nginx helm chart를 이용하고, Service type은 NodePort(HTTP:30000, HTTPS:30001)로 설정 했습니다.
이 구성은 Ingress-Nginx Controller의 Bare-metal 구성에서 Over a NodePort Service 방법을 사용한 것입니다.
Load balancing 구성은 여러가지 방법이 있을 수 있으므로, 구축하는 환경에 맞게 구성하시면 됩니다.
2) 설치가 완료되면 아래와 같이 ingress-nginx 네임스페이스와 리소스들이 생성됩니다.
$ helm ls -n ingress-nginx
NAME            NAMESPACE       REVISION        UPDATED                                 STATUS          CHART                   APP VERSION
ingress-nginx   ingress-nginx   1               2024-01-18 04:09:58.730337499 +0000 UTC deployed        ingress-nginx-4.9.0     1.9.5

$ kubectl get all -n ingress-nginx
NAME                                            READY   STATUS    RESTARTS   AGE
pod/ingress-nginx-controller-6c84576bbd-x487j   1/1     Running   0          41s

NAME                                         TYPE        CLUSTER-IP       EXTERNAL-IP   PORT(S)                      AGE
service/ingress-nginx-controller             NodePort    10.107.129.131   <none>        80:30000/TCP,443:30001/TCP   41s
service/ingress-nginx-controller-admission   ClusterIP   10.106.188.41    <none>        443/TCP                      41s

NAME                                       READY   UP-TO-DATE   AVAILABLE   AGE
deployment.apps/ingress-nginx-controller   1/1     1            1           41s

NAME                                                  DESIRED   CURRENT   READY   AGE
replicaset.apps/ingress-nginx-controller-6c84576bbd   1         1         1       41s
3)설치 후 NodePort를 특정 포트로 변경하려면 kubectl edit 명령어를 이용하여 변경합니다.
삭제는 다음과 같이 합니다.
helm uninstall ingress-nginx --namespace ingress-nginx
kubectl delete namespaces ingress-nginx
※ 자세한 내용은 아래 링크 참고 하시기 바랍니다.
- Ingress-Nginx Controller Installation Guide - Quick start
- Ingress-Nginx Controller - Bare-metal considerations
- Ingress-Nginx Helm chart
8. Storage Class 구성
이제 Storage를 설칳 ㅏ기 위해 Woker Node에 NFS를 설치를 진행합니다.
※미리 준비된 NFS Server의 Storage를 Dynamic Volume provisioning영역으로 사용하기 위해서
Storage Class를 구성합니다.
1) 먼저, 워크로드가 실행될 노드( (worker) node )에 NFS Client를 설치합니다.
sudo apt-get update
sudo apt-get install -y nfs-common
2) 다음은 NFS Server에서 공유된 디렉토리의 정보를 확인합니다.
※이 영역은 미리 준비되어 있어야 합니다.
$ showmount -e 172.31.26.107
Export list for 172.31.26.107:
/data/k8s-volume 172.31.16.0/20
※ 위 예시는 172.31.26.107 에 NFS Server가 구성되어 있는 예시입니다. /data/k8s-volume 디렉토리가 Volume 영역으로 사용되고 172.31.16.0/20에서 접근 가능한 구성입니다.
3) 이제 NFS Subdir External Provisioner 를 설치합니다.
$ helm repo add nfs-subdir-external-provisioner https://kubernetes-sigs.github.io/nfs-subdir-external-provisioner/
$ helm install nfs-subdir-external-provisioner nfs-subdir-external-provisioner/nfs-subdir-external-provisioner \
    --create-namespace --namespace nfs-provisioner \
    --set nfs.server=172.31.26.107 \
    --set nfs.path=/data/k8s-volume \
    --set storageClass.defaultClass=true
※ nfs.server(NFS Server의 IP Address)와 nfs.path(NFS Server의 Volume 영역)는 앞서 확인한 정보를 참조하여 설정합니다.
4) 설치 후 확인은 아래와 같이 합니다.
$ kubectl get storageclasses
NAME                   PROVISIONER                                     RECLAIMPOLICY   VOLUMEBINDINGMODE   ALLOWVOLUMEEXPANSION   AGE
nfs-client (default)   cluster.local/nfs-subdir-external-provisioner   Delete          Immediate           true                   33d
$ kubectl describe storageclasses nfs-client
Name:                  nfs-client
IsDefaultClass:        Yes
Annotations:           meta.helm.sh/release-name=nfs-subdir-external-provisioner,meta.helm.sh/release-namespace=nfs-provisioner,storageclass.kubernetes.io/is-default-class=true
Provisioner:           cluster.local/nfs-subdir-external-provisioner
Parameters:            archiveOnDelete=true
AllowVolumeExpansion:  True
MountOptions:          <none>
ReclaimPolicy:         Delete
VolumeBindingMode:     Immediate
Events:                <none>
※ 세부내역은 아래 링크를 참고 하시기 바랍니다.
관련 문서 : Storage Classes
관련 문서 : nfs-subdir-external-provisioner
이제 Kubernetis Cluster를 모두 구성 완료 하였습니다.
그럼 오늘 포스팅은 여기까지... ^.6
'아마존 클라우드' 카테고리의 다른 글
| [아마존 클라우드] Amazon VPC에서 Auto Scaling 구성하 (61) | 2025.03.26 |
|---|---|
| [AWS] Role Assumption Challenge (32) | 2025.03.23 |
| [AWS] Route53과 도메인 및 인증서 생성 (66) | 2024.02.21 |
| [클라우드] IAM Policy 알아보기 (73) | 2024.01.09 |
| [클라우드] AWS IAM 기본 구조 (60) | 2024.01.07 |