good morning..
After a while, I will post an article related to my major.
Today's post is about Amazon CodeCommit.
What is CodeCommit? AWS CodeCommit is a cloud-based source code control service for secure Git-based repositories.
It provides functions for developers to store and control developed sources while developing applications,
and also provides functions to manage source codes more efficiently by utilizing AWS CodeCommit's import, branch, and merge functions.
So let's take a look at how to use CodeCommit.
First, create a CodeCommt repository for storing source code.
1. To create an AWS CodeCommit repository, enter Codecommit as shown below in Amazon's service search window and search for the service.

2. Click Codecommit in the searched content and click 'Create Repository' in the screen below.

3. Enter each value as shown in the screen below and click the Create button.
Repository name: Code-Repo
Create - Optional: Code-Repository

4. As shown in the screen below, a repository for source code has been created.

5. Connect to the local computer or EC3 Instance (the computer to develop the source). Here we use EC2 Instance.

6. Now install git for local repository for source code using git from CLI.
Run command: sudo yum install -y git

7. Run the command below to configure Git credential helper with AWS credential profile and enable Git credential helper to send paths to repositories.
command:
git config --global credential.helper '!aws codecommit credential-helper $@'
git config --global credential.UseHttpPath true

8. Search for Comdecommit in the AWS Console service search and search for the repository you just created.

9. Click Clone URL and HTTPS in the upper right corner of the screen.

Use the command below to clone the created repository on your local computer and Amazon.
get clone https://git-codecommit.us-east-1.amazonaws.com/v1/repos/Code-Repo (Copied HTTPS ulr)
10. Now let's proceed to modify the source code in the local repository, stage the changes, and apply them to the AWS Codecommit repository.
A folder with the same name as the CodeCommit repository should now be created on your local computer.
Then use the cd command to move to that directory.

11. Create two files on the local computer using the command below.
echo "The domestic cat (Felis catus or Felis silvestris catus) is a small, usually furry, domesticated, and carnivorous mammal." >cat.txt
echo "The domestic dog (Canis lupus familiaris) is a canid that is known as man's best friend." >dog.txt

Check the created file using the ls -al command.

13. Use the command below to stage the two created files and check their status.
git add cat.txt dog.txt
git status
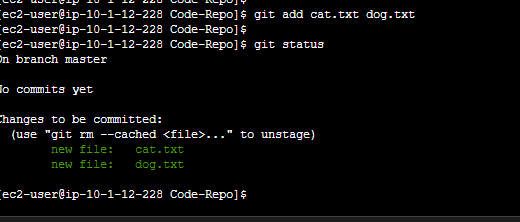
The output should show the branch you're currently working on (master) and that you're ready to commit both files to the repository, like this:
14. Now commit using the command below.
git commit -m "Added cat.txt and dog.txt"

You should see a message in the output that the committer's name and email address have been automatically configured.In production, use the listed commands to set your name and email address, which will then apply to each commit you make. The output also shows two files changed and inserted:
15. If you want to review the results performed above again, query using the command below.

16. Now, let's push the created file from the local repository to Amazon's Repogiroty.
git push -u origin master

17. Now to check if the files created in Amazon CodeCommit have been uploaded
In the AWS Service Console window, find Code-Repo and click it.

18. Now the uploaded files will look like below.

Now, you have completed creating and linking the source code repository using local (development computer) and Amazon's CodeCommit.
'AWS Cloud' 카테고리의 다른 글
| [Cloud] Creating Amazon VPC and RDS (25) | 2023.07.29 |
|---|---|
| [Cloud] Using Amazon Load Balancer NLB (77) | 2023.07.16 |
| [Cloud] Using Amazon EKS Auto scaling (82) | 2023.05.18 |
| [Cloud] using AWS CI/CD -2 using Codepipeline (0) | 2023.05.14 |
| [Cloud] Using AWS CI/CD -3 create cluster and deploy by using EKS (0) | 2023.05.14 |