Hello neighbors ^.^
In this post, I would like to post about how to build a kUBENETIS cluster in AWS Cloud.
Cluster configuration is a VM-based configuration of one controller node and two worker nodes.
Then shall we get started?
1. Node VM(Virtual machine) Preparation
Node VMs should be prepared for Kubernetes cluster configuration.
All VM nodes must be connected to the Internet and must be configured with a Public IP Address.
The information of the nodes to be configured is as follows.
Node nameOSNode typeVPCPublic IPStorage
| k8s-controlplane | Ubuntu Server 22.04 LTS | t3.medium | Default VPC | Enable | 20GiB |
| k8s-node01 | Ubuntu Server 22.04 LTS | t3.medium | Default VPC | Enable | 20GiB |
| k8s-node02 | Ubuntu Server 22.04 LTS | t3.medium | Default VPC | Enable | 20GB |
Log in to AWS Web console with your own account to configure the Node VM.
Search EC2 in the search bar and click.
In ec2, click Launch and Instance to create three VMs that fit the above specifications.
Below is the procedure for creating a k8s-controlplane VM.
The remaining two VMs will be referred to the procedure below to create a VM that meets the above specifications.
1) Select the VM name and OS Image.

2) Select the Instance Type that meets the specifications of the application you want to configure.
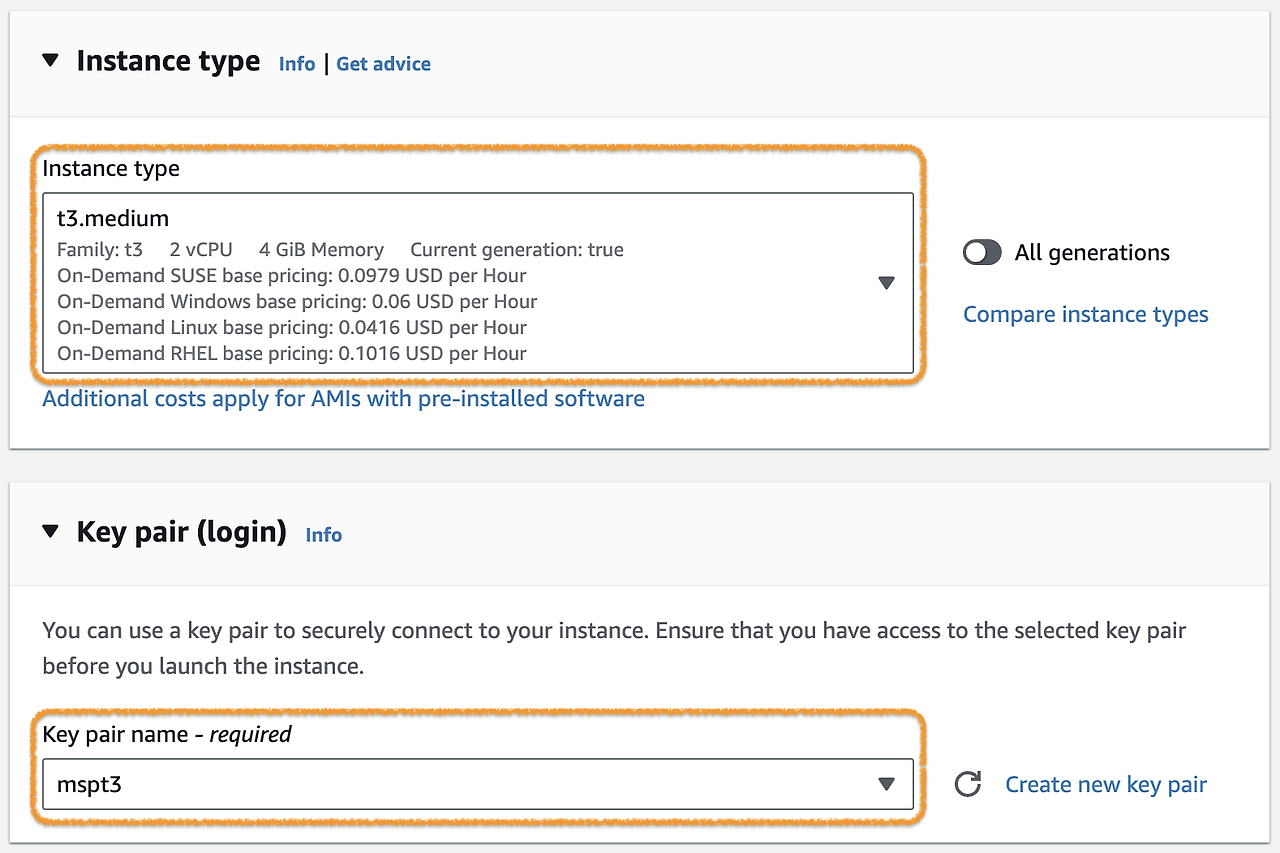
3) In Network Setting, VPC selects Default, Subnet selects one of the available AZs
Select the security group that only uses ssh as below.

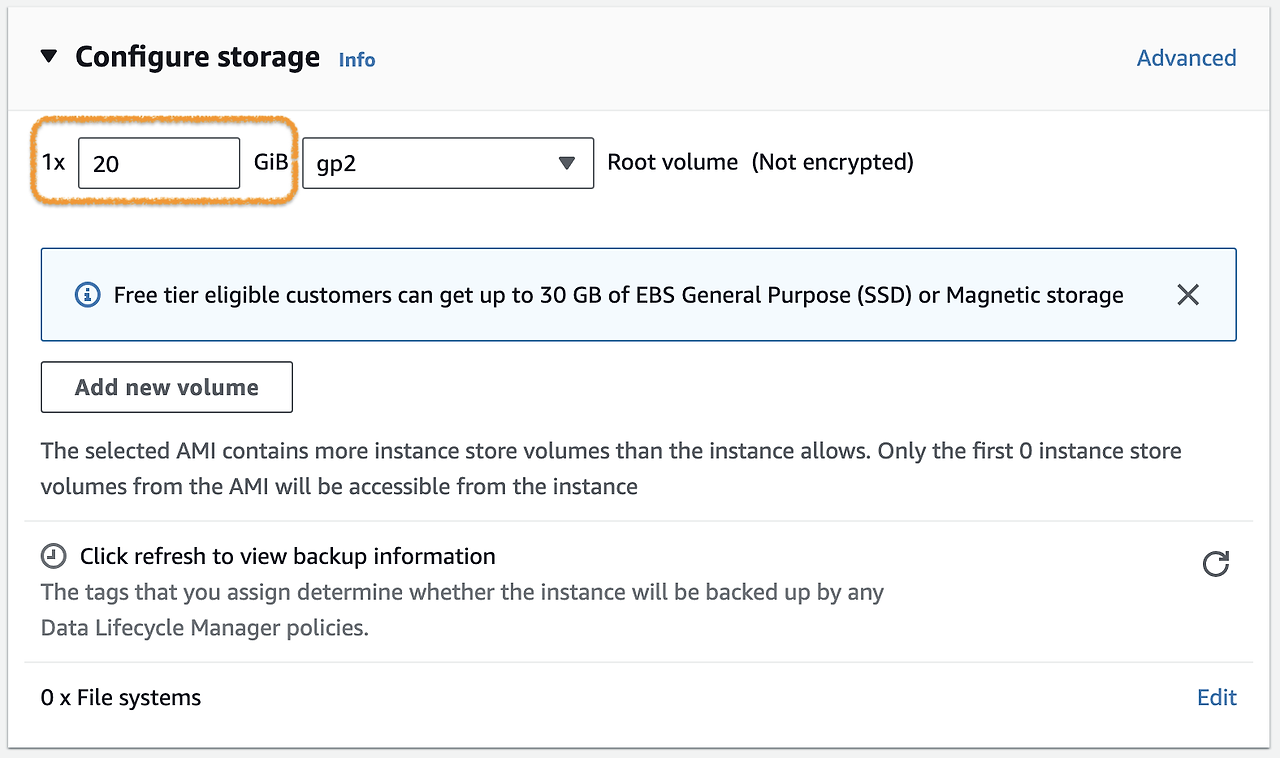
4) Set the Storage on the Instance to the capacity of the application.
2.Install Container runtime
Once the Noce VM is ready, you must now install Container Runtime to control the Container.
Let's install containerd here.
The procedure below requires installation on all three prepared Node VMs
After connecting to ssh to each node, proceed with the following procedure.
※ See Container Routes for more information
1) Network Settings
You must set up the iptables proxy according to Network Plugin Requirements.
Run the command below.
cat <<EOF | sudo tee /etc/modules-load.d/k8s.conf
overlay
br_netfilter
EOF

sudo modprobe overlay
sudo modprobe br_netfilter

# sysctl params required by setup, params persist across reboots
cat <<EOF | sudo tee /etc/sysctl.d/k8s.conf
net.bridge.bridge-nf-call-iptables  = 1
net.bridge.bridge-nf-call-ip6tables = 1
net.ipv4.ip_forward                 = 1
EOF

# Apply sysctl params without reboot
sudo sysctl --system
※ Please refer to the link below for details
- Install and configure prerequisite
2) containerd installation
Install containerd as apt package as below.
# Add Docker's official GPG key:
sudo apt-get update
sudo apt-get install -y ca-certificates curl gnupg
sudo install -m 0755 -d /etc/apt/keyrings
curl -fsSL https://download.docker.com/linux/ubuntu/gpg | sudo gpg --dearmor -o /etc/apt/keyrings/docker.gpg
sudo chmod a+r /etc/apt/keyrings/docker.gpg

# Add the repository to Apt sources:
echo \
  "deb [arch=$(dpkg --print-architecture) signed-by=/etc/apt/keyrings/docker.gpg] https://download.docker.com/linux/ubuntu \
  $(. /etc/os-release && echo "$VERSION_CODENAME") stable" | \
  sudo tee /etc/apt/sources.list.d/docker.list > /dev/null
sudo apt-get update
sudo apt-get install -y containerd.io
※ Please refer to the following for related documents.
Getting started with containerd - Installing containerd - Option 2: From apt-get , Install Docker Engine on Ubuntu
3) containerd settings
Use systemd as the cgroup driver, and for CRI Support, change the settings for containrd as follows.
First, create the config.toml file. (overwrite)
containerd config default | sudo tee /etc/containerd/config.toml
※ Record the default config. of the containerd in the config.toml file
Change this part because the default config. in Containerd says SystemdCgroup = false.
sudo sed -i 's/SystemdCgroup = false/SystemdCgroup = true/g' /etc/containerd/config.toml
The results should be as follows.
disabled_plugins do not contain cri.
SystemdCgroup = true ( [plugins."io.containerd.grpc.v1.cri".containerd.runtimes.runc.options] )
$ sudo cat /etc/containerd/config.toml | grep disabled_plugins
disabled_plugins = []
$ sudo cat /etc/containerd/config.toml | grep SystemdCgroup
            SystemdCgroup = true
Once you have changed the settings, run the command below to restart containerd.
sudo systemctl restart containerd
3. Install kubeadm, kubelet, kubectl
Now install the following three packages on each VM to run Kuvenetis on the Node VM.
All installation procedures are the same.
-kubeadm : Kubernetes Cluster Management Tool
-kubelet : controll Pod/Container
-kubectl: Kubernetes CLI
Run the following commands on each vm.
※ The command below is based on Kubernetes v1.29.
sudo apt-get update
# apt-transport-https may be a dummy package; if so, you can skip that package
sudo apt-get install -y apt-transport-https ca-certificates curl gpg

curl -fsSL https://pkgs.k8s.io/core:/stable:/v1.29/deb/Release.key | sudo gpg --dearmor -o /etc/apt/keyrings/kubernetes-apt-keyring.gpg

# This overwrites any existing configuration in /etc/apt/sources.list.d/kubernetes.list
echo 'deb [signed-by=/etc/apt/keyrings/kubernetes-apt-keyring.gpg] https://pkgs.k8s.io/core:/stable:/v1.29/deb/ /' | sudo tee /etc/apt/sources.list.d/kubernetes.list

sudo apt-get update
sudo apt-get install -y kubelet kubeadm kubectl
sudo apt-mark hold kubelet kubeadm kubectl
※ Please refer to the link below for details.
Installing kubeadm, kubelet and kubectl
4. Configure Control-plane node
If the three packages have been installed on all VMs, now do the following in the Node VM that you want to use as the Controller Node.
Worker Node VM should not proceed.
1) First, check the IP Address of the Control-plane node using the command below.
(In case of AWS EC2, Private IPv4 addresses)
$ ip route show
default via 172.31.16.1 dev ens5 proto dhcp src 172.31.30.145 metric 100
...
※ If it is output as above, 172.31.30.145 is the IP Address of this node.
2) Run the command below to install and execute the Control-plane components in the Control-plane node.
sudo kubeadm init --apiserver-advertise-address=172.31.30.145 --pod-network-cidr=10.244.0.0/16
※ Please refer to the following for an explanation of each parameter.
--apiserver-advertise-address : Control-plane node의 IP Address
--pod-network-cidr : set according to the network add-on to be used (example above is configuration for Flannel)
Below is an example of the execution results.
$ sudo kubeadm init --apiserver-advertise-address=172.31.30.145 --pod-network-cidr=10.244.0.0/16
[init] Using Kubernetes version: v1.29.0
[preflight] Running pre-flight checks
[preflight] Pulling images required for setting up a Kubernetes cluster
[preflight] This might take a minute or two, depending on the speed of your internet connection
[preflight] You can also perform this action in beforehand using 'kubeadm config images pull'
W0112 08:14:02.746414    7047 checks.go:835] detected that the sandbox image "registry.k8s.io/pause:3.6" of the container runtime is inconsistent with that used by kubeadm. It is recommended that using "registry.k8s.io/pause:3.9" as the CRI sandbox image.
[certs] Using certificateDir folder "/etc/kubernetes/pki"
[certs] Generating "ca" certificate and key
[certs] Generating "apiserver" certificate and key
[certs] apiserver serving cert is signed for DNS names [ip-172-31-30-145 kubernetes kubernetes.default kubernetes.default.svc kubernetes.default.svc.cluster.local] and IPs [10.96.0.1 172.31.30.145]
[certs] Generating "apiserver-kubelet-client" certificate and key
[certs] Generating "front-proxy-ca" certificate and key
[certs] Generating "front-proxy-client" certificate and key
[certs] Generating "etcd/ca" certificate and key
[certs] Generating "etcd/server" certificate and key
[certs] etcd/server serving cert is signed for DNS names [ip-172-31-30-145 localhost] and IPs [172.31.30.145 127.0.0.1 ::1]
[certs] Generating "etcd/peer" certificate and key
[certs] etcd/peer serving cert is signed for DNS names [ip-172-31-30-145 localhost] and IPs [172.31.30.145 127.0.0.1 ::1]
[certs] Generating "etcd/healthcheck-client" certificate and key
[certs] Generating "apiserver-etcd-client" certificate and key
[certs] Generating "sa" key and public key
[kubeconfig] Using kubeconfig folder "/etc/kubernetes"
[kubeconfig] Writing "admin.conf" kubeconfig file
[kubeconfig] Writing "super-admin.conf" kubeconfig file
[kubeconfig] Writing "kubelet.conf" kubeconfig file
[kubeconfig] Writing "controller-manager.conf" kubeconfig file
[kubeconfig] Writing "scheduler.conf" kubeconfig file
[etcd] Creating static Pod manifest for local etcd in "/etc/kubernetes/manifests"
[control-plane] Using manifest folder "/etc/kubernetes/manifests"
[control-plane] Creating static Pod manifest for "kube-apiserver"
[control-plane] Creating static Pod manifest for "kube-controller-manager"
[control-plane] Creating static Pod manifest for "kube-scheduler"
[kubelet-start] Writing kubelet environment file with flags to file "/var/lib/kubelet/kubeadm-flags.env"
[kubelet-start] Writing kubelet configuration to file "/var/lib/kubelet/config.yaml"
[kubelet-start] Starting the kubelet
[wait-control-plane] Waiting for the kubelet to boot up the control plane as static Pods from directory "/etc/kubernetes/manifests". This can take up to 4m0s
[apiclient] All control plane components are healthy after 7.002440 seconds
[upload-config] Storing the configuration used in ConfigMap "kubeadm-config" in the "kube-system" Namespace
[kubelet] Creating a ConfigMap "kubelet-config" in namespace kube-system with the configuration for the kubelets in the cluster
[upload-certs] Skipping phase. Please see --upload-certs
[mark-control-plane] Marking the node ip-172-31-30-145 as control-plane by adding the labels: [node-role.kubernetes.io/control-plane node.kubernetes.io/exclude-from-external-load-balancers]
[mark-control-plane] Marking the node ip-172-31-30-145 as control-plane by adding the taints [node-role.kubernetes.io/control-plane:NoSchedule]
[bootstrap-token] Using token: ev57z0.770ldkwdxb8if9bn
[bootstrap-token] Configuring bootstrap tokens, cluster-info ConfigMap, RBAC Roles
[bootstrap-token] Configured RBAC rules to allow Node Bootstrap tokens to get nodes
[bootstrap-token] Configured RBAC rules to allow Node Bootstrap tokens to post CSRs in order for nodes to get long term certificate credentials
[bootstrap-token] Configured RBAC rules to allow the csrapprover controller automatically approve CSRs from a Node Bootstrap Token
[bootstrap-token] Configured RBAC rules to allow certificate rotation for all node client certificates in the cluster
[bootstrap-token] Creating the "cluster-info" ConfigMap in the "kube-public" namespace
[kubelet-finalize] Updating "/etc/kubernetes/kubelet.conf" to point to a rotatable kubelet client certificate and key
[addons] Applied essential addon: CoreDNS
[addons] Applied essential addon: kube-proxy

Your Kubernetes control-plane has initialized successfully!

To start using your cluster, you need to run the following as a regular user:

  mkdir -p $HOME/.kube
  sudo cp -i /etc/kubernetes/admin.conf $HOME/.kube/config
  sudo chown $(id -u):$(id -g) $HOME/.kube/config

Alternatively, if you are the root user, you can run:

  export KUBECONFIG=/etc/kubernetes/admin.conf

You should now deploy a pod network to the cluster.
Run "kubectl apply -f [podnetwork].yaml" with one of the options listed at:
  https://kubernetes.io/docs/concepts/cluster-administration/addons/

Then you can join any number of worker nodes by running the following on each as root:

kubeadm join 172.31.30.145:6443 --token ev57z0.770ldkw... \
	--discovery-token-ca-cert-hash sha256:3d98992e...
3) Execute the following command to set up kubectl.
mkdir -p $HOME/.kube
sudo cp -i /etc/kubernetes/admin.conf $HOME/.kube/config
sudo chown $(id -u):$(id -g) $HOME/.kube/config
※ Please refer to the link below to make it easier to use the kubectl CLI
4) The following is the installation of pod network add-on (for example, Flannel)
kubectl apply -f https://github.com/flannel-io/flannel/releases/latest/download/kube-flannel.yml
5) If it is normally ready, it will be shown as below.
$ kubectl get po -A
NAMESPACE      NAME                                       READY   STATUS    RESTARTS   AGE
kube-flannel   kube-flannel-ds-z97gc                      1/1     Running   0          2m1s
kube-system    coredns-76f75df574-276ns                   1/1     Running   0          5m3s
kube-system    coredns-76f75df574-swj5p                   1/1     Running   0          5m3s
kube-system    etcd-ip-172-31-26-107                      1/1     Running   0          5m17s
kube-system    kube-apiserver-ip-172-31-26-107            1/1     Running   0          5m17s
kube-system    kube-controller-manager-ip-172-31-26-107   1/1     Running   0          5m17s
kube-system    kube-proxy-x6zmg                           1/1     Running   0          5m3s
kube-system    kube-scheduler-ip-172-31-26-107            1/1     Running   0          5m18s
So far, the Control-plane node is ready.
6) Before you proceed to the next stage, you can access API Server from the console in AWS
Add the following rules to the Security Group in the Control-plane node.
※ TypeProtocolPort rangeSource
| Custom TCP | TCP | 6443 | 172.31.0.0/16 |
※ The IP range of the Source is the IP range of the (Worker) node. For information, refer to the document linked below
5. (Worker) node configuration
The Controller Node VM setup is complete, and let's proceed with the setup on the Worker Node.
Use kubeadm to configure the required configuration for the (Worker) node and join the K8s cluster.
Kubeadm join generated in the previous procedure... If you have saved the command, run it as it is, otherwise
Proceed with the procedure below.
- api-server-endpoint
- token
- discovery-token-ca-cert-hash
1) Check the Control-plane node as follows.
api-server-endpoint
$ kubectl cluster-info
Kubernetes control plane is running at https://172.31.30.145:6443
CoreDNS is running at https://172.31.30.145:6443/api/v1/namespaces/kube-system/services/kube-dns:dns/proxy

To further debug and diagnose cluster problems, use 'kubectl cluster-info dump'.
172.31.30.145:6443 is the endpoint of API Server.
2) Check the token value with the command below.
$ kubeadm token list
TOKEN                     TTL         EXPIRES                USAGES                   DESCRIPTION                                                EXTRA GROUPS
ev57z0.770ldkw...   21h         2024-01-16T05:07:18Z   authentication,signing   The default bootstrap token generated by 'kubeadm init'.   system:bootstrappers:kubeadm:default-node-token
3) find discovery-token-ca-cert-hash value
$ openssl x509 -pubkey -in /etc/kubernetes/pki/ca.crt | openssl rsa -pubin -outform der 2>/dev/null | openssl dgst -sha256 -hex | sed 's/^.* //'
3d98992e...
※ 3d98992e... This is Hash from CA Cert.
4) Combine the above information and execute the kubeadm join command as shown below
sudo kubeadm join 172.31.30.145:6443 --token ev57z0.770ldkw... --discovery-token-ca-cert-hash sha256:3d98992e...
※ Execute the above command in Worker Node.
5) If you look up the Node after Join, I will look it up as follows.
6. Install Helm
All environments are now configured and we will proceed with the installation of the Kubernetest package manager, helm.
1)Where the kubectl CLI is set up (if you followed the previous steps, the Control-plane node) installs as follows.
curl -LO https://get.helm.sh/helm-v3.13.3-linux-amd64.tar.gz
tar -zxvf helm-v3.13.3-linux-amd64.tar.gz
sudo mv linux-amd64/helm /usr/local/bin/helm
2)You can check the installation as follows.
$ helm version
version.BuildInfo{Version:"v3.13.3", GitCommit:"c8b948945e52abba22ff885446a1486cb5fd3474", GitTreeState:"clean", GoVersion:"go1.20.11"}
※ Please refer to the link below for details related to helm.
installing Helm - From the binary releases
7. Installing and Configuring the Ingress Controller
Now let's install ingress, one of Kubernetis' service objects.
1)Install Nginx with the Ingress controller using the command below.
helm install ingress-nginx ingress-nginx \
  --repo https://kubernetes.github.io/ingress-nginx \
  --namespace ingress-nginx --create-namespace \
  --set controller.service.type=NodePort \
  --set controller.service.nodePorts.http=30000 \
  --set controller.service.nodePorts.https=30001
※ Service type is set to NodePort (HTTP:30000, HTTPS:30001) using ingress-nginx helmchart.
This configuration uses the Over a NodePort Service method in the Bare-metal configuration of the Ingress-Nginx Controller. There can be many ways to configure load balancing, so you can configure it according to the environment you are building.
2) Once the installation is complete, the ingress-nginx namespace and resources are created as shown below.
$ helm ls -n ingress-nginx
NAME            NAMESPACE       REVISION        UPDATED                                 STATUS          CHART                   APP VERSION
ingress-nginx   ingress-nginx   1               2024-01-18 04:09:58.730337499 +0000 UTC deployed        ingress-nginx-4.9.0     1.9.5

$ kubectl get all -n ingress-nginx
NAME                                            READY   STATUS    RESTARTS   AGE
pod/ingress-nginx-controller-6c84576bbd-x487j   1/1     Running   0          41s

NAME                                         TYPE        CLUSTER-IP       EXTERNAL-IP   PORT(S)                      AGE
service/ingress-nginx-controller             NodePort    10.107.129.131   <none>        80:30000/TCP,443:30001/TCP   41s
service/ingress-nginx-controller-admission   ClusterIP   10.106.188.41    <none>        443/TCP                      41s

NAME                                       READY   UP-TO-DATE   AVAILABLE   AGE
deployment.apps/ingress-nginx-controller   1/1     1            1           41s

NAME                                                  DESIRED   CURRENT   READY   AGE
replicaset.apps/ingress-nginx-controller-6c84576bbd   1         1         1       41s
3)To change a NodePort to a specific port after installation, use the kubectl edit command.
Delete as follows.
helm uninstall ingress-nginx --namespace ingress-nginx
kubectl delete namespaces ingress-nginx
※ Please refer to the link below for more information
- Ingress-Nginx Controller Installation Guide - Quick start
- Ingress-Nginx Controller - Bare-metal considerations
- Ingress-Nginx Helm chart
8. Configure Storage Class
To install Storage, you will now install NFS on the Woker Node.
※To use pre-prepared NFS Server Storage as a Dynamic Volume Provisioning Area
Configure Storage Classes.
1) First, install the NFS Client on the node where the workload will run.
sudo apt-get update
sudo apt-get install -y nfs-common
2) The following checks the information in the directory shared by NFS Server.
※This area must be prepared in advance.
$ showmount -e 172.31.26.107
Export list for 172.31.26.107:
/data/k8s-volume 172.31.16.0/20
※ The above example shows an NFS server configured on 172.31.26.107. The /data/k8s-volume directory is used as the volume area and is accessible from 172.31.16.0/20.
3) Now install NFS Subdir External Provisioner.
$ helm repo add nfs-subdir-external-provisioner https://kubernetes-sigs.github.io/nfs-subdir-external-provisioner/
$ helm install nfs-subdir-external-provisioner nfs-subdir-external-provisioner/nfs-subdir-external-provisioner \
    --create-namespace --namespace nfs-provisioner \
    --set nfs.server=172.31.26.107 \
    --set nfs.path=/data/k8s-volume \
    --set storageClass.defaultClass=true
※ Set the nfs.server (IP Address of the NFS Server) and nfs.path (Volume Area of the NFS Server) with reference to the information previously checked.
4) After installation, check it as follows.
$ kubectl get storageclasses
NAME                   PROVISIONER                                     RECLAIMPOLICY   VOLUMEBINDINGMODE   ALLOWVOLUMEEXPANSION   AGE
nfs-client (default)   cluster.local/nfs-subdir-external-provisioner   Delete          Immediate           true                   33d
$ kubectl describe storageclasses nfs-client
Name:                  nfs-client
IsDefaultClass:        Yes
Annotations:           meta.helm.sh/release-name=nfs-subdir-external-provisioner,meta.helm.sh/release-namespace=nfs-provisioner,storageclass.kubernetes.io/is-default-class=true
Provisioner:           cluster.local/nfs-subdir-external-provisioner
Parameters:            archiveOnDelete=true
AllowVolumeExpansion:  True
MountOptions:          <none>
ReclaimPolicy:         Delete
VolumeBindingMode:     Immediate
Events:                <none>
You have now finished configuring all Kubernetis clusters.
That's it for today's posting... ^.6
'AWS Cloud' 카테고리의 다른 글
| [AWS Cloud] Route 53 and Creation of Domain Certificate (112) | 2024.02.22 |
|---|---|
| [클라우드] AWS Simple Storage S3 사용하기 (128) | 2023.08.03 |
| [Cloud] Creating Amazon VPC and RDS (25) | 2023.07.29 |
| [Cloud] Using Amazon Load Balancer NLB (77) | 2023.07.16 |
| [Cloud] Using CodeCommit. (42) | 2023.07.15 |